海运的博客

ROS标记中的mark-connection和mark-packet区别

发布时间:November 7, 2012 // 分类:ROS // No Comments

之前有记录使用ROS做QOS的一些心得,关于使用mark-connection和mark-packet还有一些疑问,mark-connection和mark-packet有什么区别,为什么要用mark-connection?下面是个人的一些理解:
1.标记mark-connection和mark-packet主要区别:

#https://www.haiyun.me
mark-connection应用到同一连接中的所有数据包,容易识别上传、下载数据包;
mark-packet仅标记单一数据包,识别上传、下载需双向标记所有数据包。

2.标记mark-connection和mark-packet性能分析,数据包标记mark-packet示例:

/ip firewall mangle
add chain=prerouting action=mark-packet new-packet-mark=HTTP protocol=tcp dst-port=80 in-interface=bridge-local
add chain=prerouting action=mark-packet new-packet-mark=HTTP protocol=tcp dst-port=80 in-interface=pppoe-out1
#这样Mangle对经过的每个数据包都要进行mark-packet,数据包是否TCP协议?目标端口是否80?进入网络端口是?

连接标记mark-connection示例:

add chain=prerouting action=mark-connection new-connection-mark=HTTP protocol=tcp dst-port=80 in-interface=bridge-local
add chain=prerouting action=mark-packet new-packet-mark=HTTP in-interface=bridge-local connection-mark=HTTP
#这样在Mangle链只需进行以下判断,是否新连接?是否有连接标记?

3.在QOS中使用mark-connection还是mark-packet?

使用队列限速要时上传、下载要分开,所以只能识别mark-packet;
标记单向数据包使用mark-packet,如小数据包、TCP标志(SYN)优先之类的;
标记双向数据包mark-packet和mark-connection都可实现,通过上面例子使用mark-connection更优。

4.在多线带宽叠加和策略路由时要先标记数据再标记路由,这个时候就要用mark-connection了,因为同一连接不同数据包最好从同一出口发出。

ip firewall mangle add chain=prerouting action=mark-connection new-connection-mark=www.haiyun.me \
protocol=tcp dst-port=80 connection-state=new 
ip firewall mangle add chain=prerouting action=mark-routing new-routing-mark=www.haiyun.me \
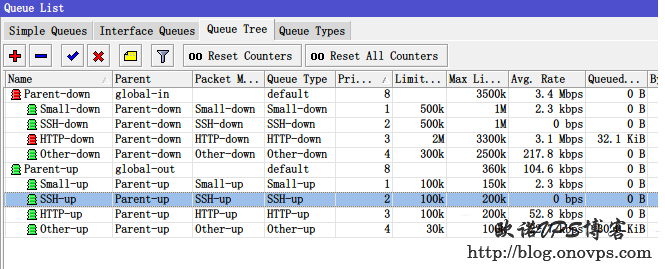
connection-mark=www.haiyun.me 

一个实例:ROS单线ADSL使用、HTB、PCQ做流量控制

ROS下单线ADSL使用HTB+PCQ限速

发布时间:October 18, 2012 // 分类:ROS // 7 Comments

单线ADSL带宽4M,线路损耗后实际速度3.5M左右,上传350k左右,由于ADSL满速下载、上传速度会变慢,配置ROS最高上传、下载不得超过总带宽90%,QOS配置如下:
首先分类标记上传、下载数据:

#https://www.haiyun.me
/ip firewall mangle
#小数据
add chain=prerouting action=mark-connection new-connection-mark=Small-conn passthrough=yes protocol=icmp comment=Small
add chain=prerouting action=mark-connection new-connection-mark=Small-conn passthrough=yes protocol=udp dst-port=53
add chain=postrouting action=mark-connection new-connection-mark=Small-conn passthrough=yes protocol=udp dst-port=53
add chain=prerouting action=mark-connection new-connection-mark=Small-conn passthrough=yes protocol=udp dst-port=123
add chain=postrouting action=mark-packet new-packet-mark=Small-up passthrough=no out-interface=pppoe-out1 connection-mark=Small-conn 
add chain=prerouting action=mark-packet new-packet-mark=Small-up passthrough=no in-interface=bridge-local connection-mark=Small-conn 
add chain=prerouting action=mark-packet new-packet-mark=Small-down passthrough=no in-interface=pppoe-out1 connection-mark=Small-conn 
#SSH及VPN
add chain=prerouting action=mark-connection new-connection-mark=SSH-conn passthrough=yes protocol=tcp dst-port=22 comment=SSH
add chain=prerouting action=mark-connection new-connection-mark=SSH-conn passthrough=yes protocol=tcp dst-port=23
add chain=prerouting action=mark-packet new-packet-mark=SSH-up passthrough=no in-interface=bridge-local connection-mark=SSH-conn 
add chain=prerouting action=mark-packet new-packet-mark=SSH-down passthrough=no in-interface=pppoe-out1 connection-mark=SSH-conn 
#网页数据
add chain=prerouting action=mark-connection new-connection-mark=HTTP-conn passthrough=yes protocol=tcp dst-port=80 comment=HTTP
add chain=prerouting action=mark-connection new-connection-mark=HTTP-conn passthrough=yes protocol=tcp dst-port=443
add chain=prerouting action=mark-packet new-packet-mark=HTTP-up passthrough=no in-interface=bridge-local connection-mark=HTTP-conn 
add chain=prerouting action=mark-packet new-packet-mark=HTTP-down passthrough=no in-interface=pppoe-out1 connection-mark=HTTP-conn 
#其它
add chain=prerouting action=mark-connection new-connection-mark=Other-conn passthrough=yes comment=Other
add chain=prerouting action=mark-packet new-packet-mark=Other-up passthrough=no in-interface=bridge-local connection-mark=Other-conn 
add chain=prerouting action=mark-packet new-packet-mark=Other-down passthrough=no in-interface=pppoe-out1 connection-mark=Other-conn

新建队列类型为PCQ

#pcq-rate为每个了数据流最大速度,0为按数据流数公平分配带宽,pcq-limit为每一数据流队列长度;
#pcq-total-limit不能小于内网主机数*pcq-limit。
/queue type 
add name="Small-down" kind=pcq pcq-rate=0 pcq-limit=50 pcq-classifier=dst-address pcq-total-limit=2000 
add name="Small-up" kind=pcq pcq-rate=50k pcq-limit=50 pcq-classifier=src-address pcq-total-limit=2000 
add name="SSH-down" kind=pcq pcq-rate=0 pcq-limit=50 pcq-classifier=dst-address pcq-total-limit=2000 
add name="SSH-up" kind=pcq pcq-rate=50k pcq-limit=50 pcq-classifier=src-address pcq-total-limit=2000 
add name="HTTP-down" kind=pcq pcq-rate=0 pcq-limit=50 pcq-classifier=dst-address pcq-total-limit=2000 
add name="HTTP-up" kind=pcq pcq-rate=80k pcq-limit=50 pcq-classifier=src-address pcq-total-limit=2000 
add name="Other-down" kind=pcq pcq-rate=0 pcq-limit=50 pcq-classifier=dst-address pcq-total-limit=2000 
add name="Other-up" kind=pcq pcq-rate=30k pcq-limit=50 pcq-classifier=src-address pcq-total-limit=2000 

添加队列树调用之前标记的数据包设置优先级,队列类型设置为之前新建的PCQ类型。

/queue tree
add name="Parent-up" parent=global-out limit-at=330k max-limit=330k
add name="Parent-down" parent=global-in limit-at=3300k max-limit=3300k
add name=Small-up parent=Parent-up packet-mark=Small-up limit-at=70k max-limit=150k queue=Small-up priority=1
add name=Small-down parent=Parent-down packet-mark=Small-down limit-at=500k max-limit=1000k queue=Small-down priority=1
add name=SSH-up parent=Parent-up packet-mark=SSH-up limit-at=70k max-limit=200k queue=SSH-up priority=2
add name=SSH-down parent=Parent-down packet-mark=SSH-down limit-at=500k max-limit=1000k queue=SSH-down priority=2
add name=HTTP-up parent=Parent-up packet-mark=HTTP-up limit-at=150k max-limit=200k queue=HTTP-up priority=3
add name=HTTP-down parent=Parent-down packet-mark=HTTP-down limit-at=2000k max-limit=3000k queue=HTTP-down priority=3
add name=Other-up parent=Parent-up packet-mark=Other-up limit-at=20k max-limit=80k queue=Other-up priority=4
add name=Other-down parent=Parent-down packet-mark=Other-down limit-at=200k max-limit=2000k queue=Other-down priority=4

ros+htb+pcq限速.png
ROS路由设置HTB+PCQ流量控制的一些注意事项

1.WAN限制上传,按源地址分组;LAN限制下载,按目标地址分组;
2.passthrough是否继续向下匹配此链接,选择yes会向下匹配,下面规则如有匹配标记会改变;
3.在HTB首先满足Limit At,在父级有剩余带宽的前提下才会Max Limit,优先级高的队列优先获得Max Limit;
4.mark-connection的数据包是双向的,然后通过mark-pack区分上传和下载;
5.global-in在DNAT后,global-out在SNAT前,分别可匹配目标地址和源地址。

ROS数据包流程图:
ros数据包流程图.png
ROS防火墙处理数据包流程.png

ROS简单队列限速和PCQ动态限速配置/HTB队列树优先级限制

发布时间:July 28, 2012 // 分类:ROS // No Comments

1.ROS网络管理功能十分强大,如需简单对IP或网段进行限速可使用简单队列限速。

queue simple add target-addresses=192.168.0.0/24 limit-at=500000/1000000  max-limit=1000000/2000000 \
burst-threshold=1000000/1000000 burst-limit=1000000/3000000 burst-time=8/8 
#limit-at 限制在此速率
#max-limit 空闲时可用最大速率,未设置等于limit-at
#burst-threshold 速率阀值
#burst-limit 单位时间内速率低于阀值,可突破至此速率
#burst time 突破速率的时间间隔

2.使用简单限速用户较少时会造成带宽的浪费,为此可使用PCQ动态限速。

queue type add name=down-pcq kind=pcq pcq-rate=0 pcq-limit=50 pcq-total-limit=2000 pcq-classifier=dst-address
#PCQ下载队列,针对内部目标IP
#默认情况下仅能容纳50个用户,即2000/50,用户较多时可调整pcq-total-limit或pcq-limit数值
queue type add name=up-pcq kind=pcq pcq-rate=0 pcq-limit=50 pcq-total-limit=2000 pcq-classifier=src-address   
#PCQ上传队列,针对内部源IP
queue simple add name=pcq-queue target-addresses=192.168.1.0/24 max-limit=500000/1000000 queue=up-pcq/down-pcq
#新建简单队列应用PCQ规则

3.基于等级优先级HTB设置,可针对IP、协议进行限制。

ip firewall mangle add chain=forward action=mark-connection new-connection-mark=1.2 src-address=192.168.1.2 passthrough=yes 
ip firewall mangle add chain=forward action=mark-connection new-connection-mark=1.3 src-address=192.168.1.3 passthrough=yes 
#标记特定的连接
ip firewall mangle add chain=forward action=mark-packet new-packet-mark=1.2 connection-mark=1.3 passthrough=no 
ip firewall mangle add chain=forward action=mark-packet new-packet-mark=1.3 connection-mark=1.3 passthrough=no 
#标记特定连接的所有数据包

建立父队列:

queue tree add name=totaldown parent=ether2 limit-at=2000000 max-limit=2000000
queue tree add name=totalup parent=ether1 limit-at=500000 max-limit=500000 
#标记数据LAN为下载,WAN为上传
#Global-in识别Prerouting标记的数据
#Global-out/total能识别pre,forward,post标记的数据

建立子队列:

queue tree add name=pc1.2down parent=totaldown limit-at=2000000 max-limit=2000000 priority=2 
queue tree add name=pc1.2up parent=totalup limit-at=500000 max-limit=5555500000 priority=2 
queue tree add name=pc1.3down parent=totaldown  limit-at=1000000 max-limit=1000000 priority=3 
queue tree add name=pc1.3up parent=totalup  limit-at=500000 max-limit=500000 priority=3 
分类
最新文章
最近回复
  • Jimmy: 方法一 nghtp3步骤需要改成如下才能编译成功: git clone https://git...
  • 海运: 地址格式和udpxy一样,udpxy和msd_lite能用这个就能用。
  • 1: 怎么用 编译后的程序在家里路由器内任意一台设备上运行就可以吗?比如笔记本电脑 m参数是笔记本的...
  • 孤狼: ups_status_set: seems that UPS [BK650M2-CH] is ...
  • 孤狼: 擦。。。。apcupsd会失联 nut在冲到到100的时候会ONBATT进入关机状态,我想想办...
  • 海运: 网络,找到相应的url编辑重发请求,firefox有此功能,其它未知。
  • knetxp: 用浏览器F12网络拦截或监听后编辑重发请求,修改url中的set为set_super,将POS...
  • Albert: 啊啊啊啊啊啊啊啊啊 我太激动了,终于好了英文区搜索了半天,翻遍了 pve 论坛没找到好方法,博...
  • jiangker: good, very helpful to me
  • fengfeng: N1 armbian 能有编译下内核吗。。我要开启can 不懂怎么操作