海运的博客

PHP通过Yahoo Content Analysis API生成tag

发布时间:June 27, 2014 // 分类:PHP // No Comments

<?php
$text = 'This domain name expired on 12/6/2014 and is pending renewal or deletion.';
$query = "select * from contentanalysis.analyze where text = '".$text."'";
$url = 'http://query.yahooapis.com/v1/public/yql';
$yql_query_url = $url . "?q=" . urlencode($query);
$yql_query_url .= "&format=json";
$yql_query_url .= "&enable_categorizer=true";
$yql_query_url .= "&diagnostics=false";
$yql_query_url .= "&related_entities=true";
$yql_query_url .= "&show_metadata=true";
$ch = curl_init($yql_query_url);
curl_setopt($ch, CURLOPT_RETURNTRANSFER,true);
$result = curl_exec($ch);
curl_close($ch);
$result = json_decode($result);
var_dump($result);
if(!is_null($result->query->results)) {
  foreach($result->query->results->entities as $word) {
    if (is_array($word)) {
      foreach($word as $subword) {
        echo $subword->text->content."\n";
      }
    } else{
      echo $word->text->content."\n";
    }
  }
}
?>

文档:https://developer.yahoo.com/search/content/V2/contentAnalysis.html

Python使用Selenium/PhantomJS/chrome/firefox

发布时间:June 26, 2014 // 分类:Python // No Comments

Windows下安装setuptools和pip:
https://bootstrap.pypa.io/ez_setup.py
https://bootstrap.pypa.io/get-pip.py

python ez_setup.py
python get-pip.py

安装selenium:

pip install selenium

安装PhantomJS:

https://bitbucket.org/ariya/phantomjs/downloads/phantomjs-1.9.7-linux-x86_64.tar.bz2
tar jxvf phantomjs-1.9.7-linux-x86_64.tar.bz2
cp phantomjs-1.9.7-linux-x86_64/bin/phantomjs /bin/
chmod 755 /bin/phantomjs 

使用示例:

from selenium import webdriver
driver = webdriver.PhantomJS()
driver.get("http://www.baidu.com")
data = driver.title
print data

通过Remote Selenium Server:

from selenium import webdriver
from selenium.webdriver.common.desired_capabilities import DesiredCapabilities
driver = webdriver.Remote(
  command_executor='http://192.168.1.3:4444/wd/hub',
  desired_capabilities={'browserName': 'PhantomJS',
                                  'version': '2',
                                  'javascriptEnabled': True})
driver = webdriver.Remote(
   command_executor='http://192.168.1.3:4444/wd/hub',
   desired_capabilities=DesiredCapabilities.PHANTOMJS)
driver.get("http://www.baidu.com")
data = driver.title
print data

PhantomJS和Firefox速度对比:

import unittest
from selenium import webdriver
import time
class TestThree(unittest.TestCase):

    def setUp(self):
        self.startTime = time.time()

    def test_url_fire(self):
        self.driver = webdriver.Firefox()
        self.driver.get("http://www.qq.com")
        self.driver.quit()

    def test_url_phantom(self):
        self.driver = webdriver.PhantomJS()
        self.driver.get("http://www.qq.com")
        self.driver.quit()

    def tearDown(self):
        t = time.time() - self.startTime
        print "%s: %.3f" % (self.id(), t)
        self.driver.quit

if __name__ == '__main__':
    suite = unittest.TestLoader().loadTestsFromTestCase(TestThree)
    unittest.TextTestRunner(verbosity=0).run(suite)

远程连接chrome:

google-chrome --remote-debugging-port=9222 --no-sandbox
import time
from selenium import webdriver
from selenium.webdriver.chrome.options import Options

chrome_options = Options()
chrome_options.add_experimental_option("debuggerAddress", "127.0.0.1:9222")
driver = webdriver.Chrome(options=chrome_options)
driver.get("https://91porn.com")
html = driver.page_source
print(html)
time.sleep(2000)
driver.quit()

远程连接firefox:

firefox -marionette -start-debugger-server 2828
import time
from selenium import webdriver
from selenium.webdriver.firefox.service import Service

firefox_services = Service(executable_path='/usr/bin/geckodriver', port=3000, service_args=['--marionette-port', '2828', '--connect-existing'])
driver = webdriver.Firefox(service=firefox_services)
driver.get("https://91porn.com")
pageSource = driver.page_source
print(pageSource)
driver.quit()


#import time
#from selenium.webdriver import Firefox
#from selenium import webdriver

#driver = webdriver.Firefox()
#driver.get("https://91porn.com")
#html = driver.page_source
#print(html)
#time.sleep(2000)

PHP使用Selenium自动化运行chrome/firefox

发布时间:June 26, 2014 // 分类:PHP // 1 Comment

overviewSelenium.png
通过composer安装php-webdriver:

apt install php7.4-cli php-curl php-zip
curl -sS https://getcomposer.org/installer | php --install-dir=/usr/bin/
php composer.phar require php-webdriver/webdriver 

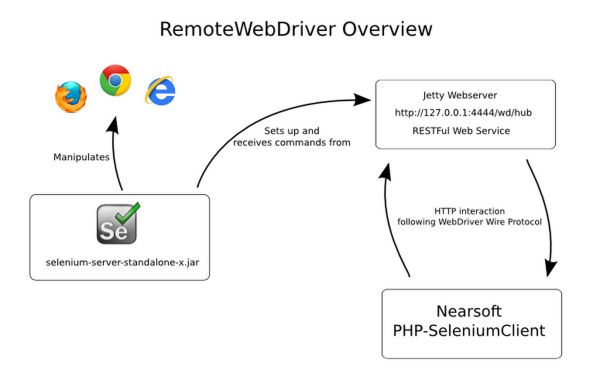
安装java环境和selenium server:

apt install openjdk-14-jre
wget https://selenium-release.storage.googleapis.com/3.141/selenium-server-standalone-3.141.59.jar
java -jar selenium-server-standalone-3.141.59.jar 

安装firefox/chrome浏览器和相应的webdirver:

wget https://dl.google.com/linux/direct/google-chrome-stable_current_amd64.deb
apt install ./google-chrome-stable_current_amd64.deb 
wget https://chromedriver.storage.googleapis.com/88.0.4324.96/chromedriver_linux64.zip
unzip chromedriver_linux64.zip 
mv chromedriver /usr/bin/
apt install firefox
wget https://github.com/mozilla/geckodriver/releases/download/v0.29.0/geckodriver-v0.29.0-linux64.tar.gz
tar zxf geckodriver-v0.29.0-linux64.tar.gz 
mv geckodriver /usr/bin/

启动浏览器需X环境支持,可使用XVNCX Window
可以使用Firefox扩展Selenium IDE: PHP Formatters录制脚本。
selenium chrome使用:

<?php
require_once('vendor/autoload.php');
use Facebook\WebDriver\Remote\DesiredCapabilities;
use Facebook\WebDriver\Remote\RemoteWebDriver;
use Facebook\WebDriver\Chrome\ChromeOptions;

$host = 'http://localhost:4444/wd/hub';
$options = new ChromeOptions();
$options->addArguments(array(
        '--no-sandbox',
        '--headless',
        '--start-maximized',
        '--user-data-dir=/tmp/chrome-user-data-dir',
        '--profile-directory=/tmp/chrome-profile-dir',
        '--user-agent=Mozilla/5.0 (X11; Linux x86_64) AppleWebKit/537.36 (KHTML, like Gecko) Chrome/88.0.4324.182 Safari/537.36'
));
$caps = DesiredCapabilities::chrome();
$caps->setCapability(ChromeOptions::CAPABILITY, $options);
$driver = RemoteWebDriver::create($host, $caps);
//default
//$driver = RemoteWebDriver::create($host, DesiredCapabilities::chrome());
//$driver->manage()->window()->maximize();
$driver->get('https://www.haiyun.me/');
var_dump($driver->getTitle());
$driver->quit();

selenium firefox使用:

<?php
namespace Facebook\WebDriver;
require 'vendor/autoload.php';
use Facebook\WebDriver\Remote\RemoteWebDriver;
use Facebook\WebDriver\Remote\DesiredCapabilities;
use Facebook\WebDriver\Firefox\FirefoxProfile;
use Facebook\WebDriver\Firefox\FirefoxDriver;

$host = 'http://localhost:4444/wd/hub';
$profile = new FirefoxProfile();
$profile->setPreference('browser.startup.homepage', 'https://github.com/facebook/php-webdriver/');
$profile->setPreference("general.useragent.override", "Mozilla/5.0");
//$profile->addExtension('./vimperator-3.8.2-fx.xpi');
$caps = DesiredCapabilities::firefox(); 
$caps->setCapability(FirefoxDriver::PROFILE, $profile); 
$caps->setCapability('moz:firefoxOptions', ['args' => ['-headless']]);
$caps->setCapability('moz:firefoxOptions', ['args' => ["-profile", "/tmp/firefox_profile"]]);
$driver = RemoteWebDriver::create($host, $caps);

//default
//$driver = RemoteWebDriver::create($host, DesiredCapabilities::firefox());
$driver->manage()->window()->maximize();
$driver->get('https://www.haiyun.me/');
var_dump($driver->getTitle());
$driver->quit();

文档:
https://github.com/php-webdriver/php-webdriver/wiki
https://php-webdriver.github.io/php-webdriver/

Centos/ubuntu下Xvfb配合x11vnc搭建VNC Server

发布时间:June 26, 2014 // 分类:CentOS // No Comments

远程运行Linux窗口程序使用X Windows太重量级了,可以使用Xvfb新建虚拟X窗口,通过x11vnc启动VNC Server并转发Xvfb启动的虚拟窗口。

apt install x11vnc xvfb
yum install xorg-x11-server-Xvfb
yum install x11vnc
#新建X虚拟窗口
Xvfb :1 -screen 0 1024x768x24 -nolisten tcp &
#设置默认窗口为新建的虚拟窗口,打开窗口程序时调用
export DISPLAY=:1
#或
DISPLAY=:1 firefox

INIT:

#!/bin/bash
#chkconfig: 345 95 50
#description: Starts xvfb on display 1
if [ -z "$1" ]; then
    echo "`basename $0` {start|stop}"
    exit
fi   
case "$1" in
    start)
    Xvfb :1 -screen 0 1024x768x24 -nolisten tcp &
    export DISPLAY=:1
    echo 'export DISPLAY=:1' >> ~/.bashrc 
    ;; 
    stop)
    killall Xvfb
    ;;
esac

新建VNC服务器并转发指定X窗口

x11vnc -listen 0.0.0.0 -rfbport 5900 -noipv6 -passwd password -display :1 -forever

然后通过VNC客户端连接,默认端口5900,Windows下可使用TightVNC或UltraVNC。
启动的软件窗口太小,设置:

xdotool search --name ".*Mozilla Firefox" windowsize 1440 900

ubuntu下firefox中文显示乱码需安装中文字体:

apt install fonts-wqy-microhei

此内容被密码保护

发布时间:June 25, 2014 // 分类:OpenWrt // No Comments

请输入密码访问

分类
最新文章
最近回复
  • 海运: 恩山有很多。
  • swsend: 大佬可以分享一下固件吗,谢谢。
  • Jimmy: 方法一 nghtp3步骤需要改成如下才能编译成功: git clone https://git...
  • 海运: 地址格式和udpxy一样,udpxy和msd_lite能用这个就能用。
  • 1: 怎么用 编译后的程序在家里路由器内任意一台设备上运行就可以吗?比如笔记本电脑 m参数是笔记本的...
  • 孤狼: ups_status_set: seems that UPS [BK650M2-CH] is ...
  • 孤狼: 擦。。。。apcupsd会失联 nut在冲到到100的时候会ONBATT进入关机状态,我想想办...
  • 海运: 网络,找到相应的url编辑重发请求,firefox有此功能,其它未知。
  • knetxp: 用浏览器F12网络拦截或监听后编辑重发请求,修改url中的set为set_super,将POS...
  • Albert: 啊啊啊啊啊啊啊啊啊 我太激动了,终于好了英文区搜索了半天,翻遍了 pve 论坛没找到好方法,博...