海运的博客

固定NFS启动端口便于iptables设置

发布时间:April 22, 2012 // 分类:Linux服务 // No Comments

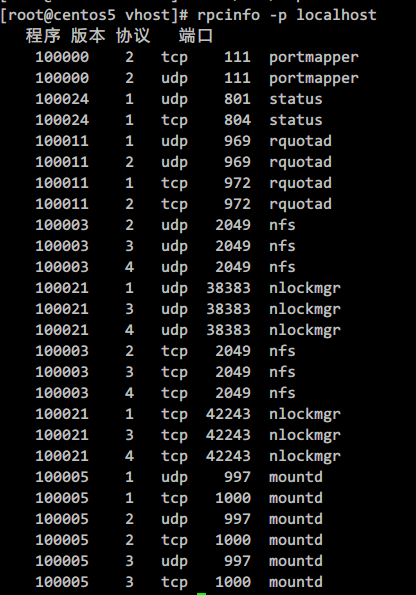
NFS启动时会随机启动多个端口并向RPC注册,这样如果使用iptables对NFS端口进行限制就会有点麻烦,可以更改配置文件固定NFS服务相关端口。
先上张图看看NFS启动后的端口:
nfs-port.png
分配端口,编辑配置文件:

vi /etc/sysconfig/nfs 

添加:

#https://www.haiyun.me
RQUOTAD_PORT=30001
LOCKD_TCPPORT=30002
LOCKD_UDPPORT=30002
MOUNTD_PORT=30003
STATD_PORT=30004

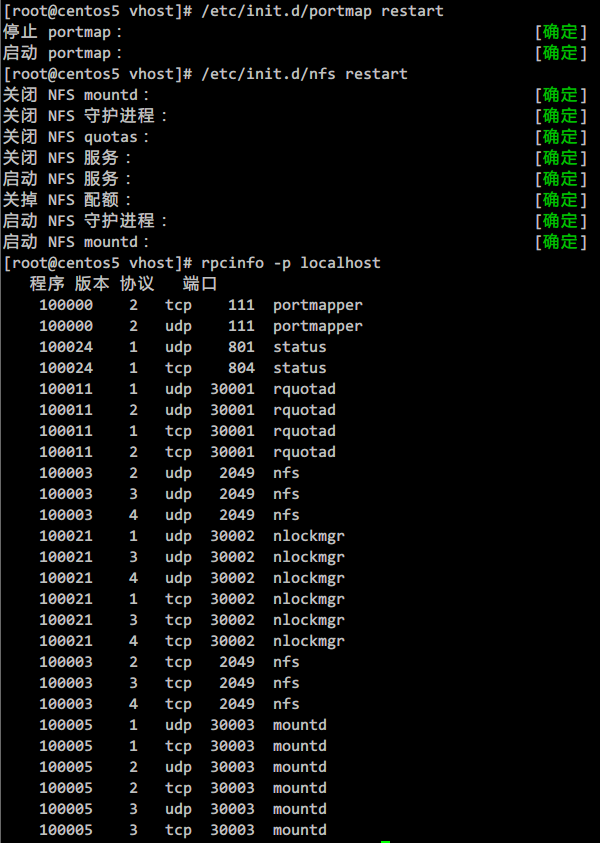
重启portmap和nfs:

/etc/init.d/portmap restart
/etc/init.d/nfs restart

现在看看启动的端口:

rpcinfo -p localhost

2012-04-22_185346.png
iptables设置:

iptables -A INPUT -s 192.168.1.1 -p tcp --dport 111 -j ACCEPT
iptables -A INPUT -s 192.168.1.1 -p udp --dport 111 -j ACCEPT
iptables -A INPUT -s 192.168.1.1 -p tcp --dport 2049 -j ACCEPT
iptables -A INPUT -s 192.168.1.1 -p udp --dport 2049 -j ACCEPT
iptables -A INPUT -s 192.168.1.1 -p tcp --dport 30001:30004 -j ACCEPT
iptables -A INPUT -s 192.168.1.1 -p udp --dport 30001:30004 -j ACCEPT
Linux/Centos7/ubuntu下安装配置NFS文件服务器

发布时间:April 22, 2012 // 分类:Linux服务 // No Comments

NFS即网络文件服务器,可以挂载管理远程主机上的文件如本地一般,特殊场合应用很方便。
CentOS下安装:

yum -y install nfs-utils

ubuntu安装:

apt install nfs-kernel-server

配置共享目录:

vim /etc/exports 
/tmp  192.168.1.0/24(rw,sync,fsid=0,no_root_squash,no_subtree_check)
#定义目录tmp,主机192.168.1.0/24可连接,有读写权限。
#fsid=0,此目录为虚拟根目录,挂载时路径填写/即可。
#默认root连接会压缩成匿名用户,如需保持root权限请添加no_root_squash参数。
#no_subtree_check,不检查父目录权限
#如/tmp   192.168.1.0/24(rw,no_root_squash)

启动NFS,NFS4不需要rpcbind。

systemctl enable rpcbind
systemctl start rpcbind
systemctl enable nfs-server
systemctl start nfs-server

查看当前共享参数:

showmount -e localhost
Export list for localhost:
/tmp 192.168.1.0/24*

或者:

exportfs

修改exports配置文件后重新生效:

exportfs -a

远端主机挂载共享目录:

mount -t nfs 192.168.1.1:/tmp /mnt
#默认当nfs服务器不在线时客户端会一直尝试连接,可设置重试次数。
#-o soft,retry=30

查看nfs状态:

#服务器端
nfsstat -s
#客户端
nfsstat -m

开启nfs调试日志,保存在/var/log/message,ubuntu在/var/log/syslog

#服务器端
rpcdebug -m nfsd -s all
#客户端
rpcdebug -m nfs -s all

关闭:

rpcdebug -m nfs -s all
rpcdebug -m nfsd -s all

NFS服务器Iptables防火墙配置:https://www.haiyun.me/archives/centos-nfs-port.html

Openwrt/Linux安装squid做透明代理缓存服务器

发布时间:April 21, 2012 // 分类:Squid,OpenWrt,Linux服务 // 3 Comments

安装Squid:

opkg update
opkg install squid
cd /etc/squid
mv squid.conf squid.conf.back
vim squid.conf

配置文件:

visible_hostname proxy.www.haiyun.me #主机名
cache_mgr onovps@www.haiyun.me #管理员邮箱
http_port 3128 transparent #监听端口3128,透明代理
icp_port 0 #单机模式
dns_nameservers 192.168.1.1 #DNS
#cache_effective_user squid #运行用户
#cache_effective_group squid #运行用户组
pid_filename /tmp/squid.pid #pid文件
error_directory /usr/share/squid/errors/Simplify_Chinese #错误提示文件
emulate_httpd_log on #开启httpd日记格式
#logformat log %>a %ui %un [%tl] "%rm %ru HTTP/%rv" %Hs %<st "%{Referer}>h" "%{User-Agent}>h" %Ss:%Sh #自定义日记模式
cache_access_log /mnt/log/access.log #日记路径
cache_log none #无cache日记
cache_store_log none #无store日记
cache_dir ufs /mnt/cache/ 2048 16 256 #硬盘缓存2G,一级目录16,二级目录256
cache_mem 16 MB #内存缓存16M
cache_swap_low 90
cache_swap_high 95
minimum_object_size 0 KB #最小缓存不限制
maximum_object_size 4096 KB #最大缓存4M
cache_vary on #开启vary缓存
connect_timeout 1 minute #连接超时1分
request_timeout 1 minutes #请求超时1分

acl QUERY urlpath_regex -i cgi-bin \?
cache deny QUERY #不缓存cgin-bin

acl bt url_regex -i ^http://.*\.torrent$
http_access deny bt    #禁止下载torrent
acl files urlpath_regex -i "/etc/squid/files.txt" #过滤下载文件后缀
acl sites dstdom_regex "/etc/squid/sites.txt"   #过滤特定网址
acl keys url_regex -i "/etc/squid/keys.txt"  #过滤特定关键词
acl nocache_sites dstdom_regex "/etc/squid/nocache_sites.txt" #指定不缓存网址
acl nocache_files urlpath_regex -i "/etc/squid/nocache_files.txt" #指定不缓存文件后缀
http_access deny files             
http_access deny sites
http_access deny keys   
cache deny nocache_sites
cache deny nocache_files

acl all src 0.0.0.0/0.0.0.0 
acl manager proto cache_object
acl localhost src 127.0.0.1/255.255.255.255
acl localnet src 192.168.1.0/255.255.255.0
acl SSL_ports port 443 563 10000
acl Safe_ports port 80 21 443 56370 210 1025-65535 280 488 591

http_access allow manager localhost
http_access deny manager
http_access allow localnet
http_access deny all

#acl apache rep_header Server ^Apache
broken_vary_encoding allow all #开启压缩
header_access X-Forwarded-For deny all #禁止 X-Forwarded头
header_access HTTP_VIA deny all   #禁止HTTP_VIA
header_access Via deny all #禁止Via头
refresh_pattern -i \.css$ 1440 50% 129600 reload-into-ims 
refresh_pattern -i \.xml$ 1440 50% 129600 reload-into-ims
refresh_pattern -i \.htm$ 1440 90% 129600 reload-into-ims
refresh_pattern -i \.html$ 1440 90% 129600 reload-into-ims
refresh_pattern -i \.shtml$ 1440 90% 129600 reload-into-ims
refresh_pattern -i \.png$ 1440 90% 129600 reload-into-ims
refresh_pattern -i \.jpg$ 1440 90% 129600 reload-into-ims
refresh_pattern -i \.jpeg$ 1440 90% 129600 reload-into-ims
refresh_pattern -i \.gif$ 1440 90% 129600 reload-into-ims
refresh_pattern -i \.bmp$ 1440 90% 129600 reload-into-ims
refresh_pattern -i \.js$ 1440 90% 129600 reload-into-ims

refresh_pattern -i \.mp3$ 1440 50% 2880 ignore-reload
refresh_pattern -i \.wmv$ 1440 50% 2880 ignore-reload
refresh_pattern -i \.rm$ 1440 50% 2880 ignore-reload
refresh_pattern -i \.swf$ 1440 50% 2880 ignore-reload
refresh_pattern -i \.mpeg$ 1440 50% 2880 ignore-reload
refresh_pattern -i \.wma$ 1440 50% 2880 ignore-reload

refresh_pattern -i \.exe$ 1440 50% 2880 ignore-reload
refresh_pattern -i \.rar$ 1440 50% 2880 ignore-reload
refresh_pattern -i \.zip$ 1440 50% 2880 ignore-reload
refresh_pattern -i \.gz$ 1440 50% 2880 ignore-reload
refresh_pattern -i \.bz2$ 1440 50% 2880 ignore-reload
refresh_pattern -i \.7z$ 1440 50% 2880 ignore-reload

squid相关指令:

squid -k reconfigure #重置
squid -k parse  #检测配置文件
squid -k shutdown #关闭
squid -k rotate  #分割日记

Openwrt下安装squid后无init脚本,管理不方便,自己简单写了个。

#/bin/bash
#Create by www.haiyun.me
case $1 in
stop)
  squid -k shutdown
  ;;
start)
  squid
  ;;
restart)
  squid -k reconfigure
  ;;
check)
  squid -k parse
  ;;
*)
  echo "Please use restart|start|stop|check"
  ;;
esac

iptables配置:

opkg install iptables-utils iptables-mod-nat-extra
iptables -t nat -A PREROUTING -i br-lan -p tcp  --dport 80 -j REDIRECT --to-ports 3128
分类
最新文章
最近回复
  • liyk: 这个方法获取的IPv6大概20分钟之后就会失效,默认路由先消失,然后Global IPV6再消失
  • 海运: 不好意思,没有。
  • zongboa: 您好,請問一下有immortalwrt設定guest Wi-Fi的GUI教學嗎?感謝您。
  • 海运: 恩山有很多。
  • swsend: 大佬可以分享一下固件吗,谢谢。
  • Jimmy: 方法一 nghtp3步骤需要改成如下才能编译成功: git clone https://git...
  • 海运: 地址格式和udpxy一样,udpxy和msd_lite能用这个就能用。
  • 1: 怎么用 编译后的程序在家里路由器内任意一台设备上运行就可以吗?比如笔记本电脑 m参数是笔记本的...
  • 孤狼: ups_status_set: seems that UPS [BK650M2-CH] is ...
  • 孤狼: 擦。。。。apcupsd会失联 nut在冲到到100的时候会ONBATT进入关机状态,我想想办...