海运的博客

Centos服务器安全配置SSH使用Google Authenticator二次验证

发布时间:August 30, 2012 // 分类:网络安全 // 2 Comments

CentOS安装所需组件:

yum -y install mercurial pam-devel

安装Google Authenticator:

#https://www.haiyun.me
wget --no-check-certificate https://google-authenticator.googlecode.com/files/libpam-google-authenticator-1.0-source.tar.bz2
tar jxvf libpam-google-authenticator-1.0-source.tar.bz2 
cd libpam-google-authenticator-1.0
make
make install

SSH登录时调用google-authenticator模块,编辑:

/etc/pam.d/sshd

第一行添加:

auth       required     pam_google_authenticator.so

修改SSH配置文件:

vim /etc/ssh/sshd_config

添加或修改以下内容:

ChallengeResponseAuthentication yes
UsePAM yes

重启SSH:

/etc/init.d/sshd restart

生成google-authenticator配置,运行:

google-authenticator 
Do you want authentication tokens to be time-based (y/n) y
https://www.google.com/chart?chs=200x200&chld=M|0&cht=qr&chl=otpauth://totp/root@node1.www.haiyun.me%3Fsecret%3DABEXG5K6CVB56BXY
#此网址为生成的二维码,客户端扫描
Your new secret key is: www.haiyun.me
Your verification code is 582849
Your emergency scratch codes are:
  30776626
  14200155
  80795568
  23936997
  21919909
#上面几行数字为应急码
Do you want me to update your "/root/.google_authenticator" file (y/n) y
#更新配置文件
Do you want to disallow multiple uses of the same authentication
token? This restricts you to one login about every 30s, but it increases
your chances to notice or even prevent man-in-the-middle attacks (y/n) y
#禁止一个口令多用
By default, tokens are good for 30 seconds and in order to compensate for
possible time-skew between the client and the server, we allow an extra
token before and after the current time. If you experience problems with poor
time synchronization, you can increase the window from its default
size of 1:30min to about 4min. Do you want to do so (y/n) n
#客户端与服务器时间误差
If the computer that you are logging into isn't hardened against brute-force
login attempts, you can enable rate-limiting for the authentication module.
By default, this limits attackers to no more than 3 login attempts every 30s.
Do you want to enable rate-limiting (y/n) y
#次数限制

Android安装google-authenticator客户端,扫描添加上方网址的二维码,以后在登录服务器时输入账号密码的同时还需输入google-authenticator即时生成的验证码才能登录。

ssh www.haiyun.me
Verification code: 
Password: 
用knockd远程管理iptables防火墙SSH端口

发布时间:June 28, 2012 // 分类:网络安全 // No Comments

之前有介绍Iptables模块recent通过暗语来开启SSH端口,knockd也可实现此功能。
knockd监听3个自定义端口,如果收到客户端请求符合要求即执行设置的指令,让iptables开启SSH端口允许客户IP连接。
安装所需组件,不然编译会提示错误。

yum install libpcap-devel

knockd源码编译安装:

wget http://www.zeroflux.org/proj/knock/files/knock-0.5.tar.gz
tar zxvf knock-0.5.tar.gz 
cd knock-0.5
./configure 
make
make install

下载knock rpm包安装:

wget http://pkgs.repoforge.org/knock/knock-0.5-1.el5.rf.i386.rpm
rpm -ivh knock-0.5-1.el5.rf.i386.rpm 

knockd配置:

cat /etc/knockd.conf
  [options]
        logfile = /var/log/knockd.log #日志记录目录
        interface = eth0  #监听网卡

  [opencloseSSH]
        sequence      = 6000:udp,5000:tcp,4000:udp #knock侦听端口协议
        seq_timeout   = 15 #单位时间内连续触发上面的端口规则
        tcpflags      = syn #封包标志,syn/ack/fin
        start_command = iptables -I INPUT -s %IP% -p tcp --syn --dport 22 -j ACCEPT
        #如果触发规则执行的iptables操作
        cmd_timeout   = 10 #规则触发后未连接超时时间        
        stop_command  = iptables -D INPUT -s %IP% -p tcp --syn --dport 22 -j ACCEPT
        #如超时未连接或断开连接执行iptalbes操作

knock init启动管理脚本:

#!/bin/sh
# chkconfig: - 99 00
# description: Start and stop knockd

# Check that config file exist
[ -f /etc/knockd.conf ] || exit 0

# Source function library
. /etc/rc.d/init.d/functions

# Source networking configuration
. /etc/sysconfig/network

# Check that networking is up
[ "$NETWORKING" = "no" ] && exit 0

start() {
  echo "Starting knockd ..."
  /usr/local/sbin/knockd -d
  }

stop() {
  echo "Shutting down knockd ..."
  pkill knockd
  }

case "$1" in
  start)
    start
    ;;
  stop)
    stop
    ;;
  restart)
    stop
    start
    ;;
  *)
    echo "Usage: $0 {start|stop|restart}"
    ;;
esac

exit 0

客户端连接SSH需先使用telnet依次连接knock设定端口,或使用knock客户端连接。

knock -v www.haiyun.me 6000:udp 5000:tcp 4000:udp

查看knock日志:

cat /var/log/knockd.log 
[2012-08-31 10:41] 192.168.1.16: opencloseSSH: Stage 1
[2012-08-31 10:41] 192.168.1.16: opencloseSSH: Stage 2
[2012-08-31 10:41] 192.168.1.16: opencloseSSH: Stage 3
[2012-08-31 10:41] 192.168.1.16: opencloseSSH: OPEN SESAME
[2012-08-31 10:41] opencloseSSH: running command: iptables -I INPUT -s 192.168.1.16 -p tcp --syn --dport 22 -j ACCEPT

[2012-08-31 10:41] 192.168.1.16: opencloseSSH: command timeout
[2012-08-31 10:41] opencloseSSH: running command: iptables -D INPUT -s 192.168.1.16 -p tcp --syn --dport 22 -j ACCEPT

备注:如果网络较差,且同时使用tcp和udp进行验证可能会导致数据包到达顺序不一致或某个包丢失导致验证失败。

Linux/Centos服务器ssh安全设置

发布时间:April 28, 2012 // 分类:网络安全 // 2 Comments

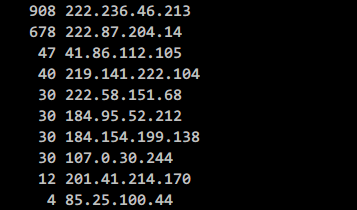
互联网很危险,SSH做为服务器的大门一定要做好安全设置,我曾经做过测试,一台VPS开启ssh服务监听默认端口22,几天后secure日记分割了10多个,统计最新几小时的恶意登录失败的IP数据如下:
ssh恶意登录统计.png
真是个恐怖的次数,蛋痛的人太多了,如果密码稍简单就被破解了,如需自动封IP请参考:iptables自动封IP防SSH被暴力破解
1.更改默认端口,网上很多针对22端口扫描的软件,这样不会被误伤。

#https://www.haiyun.me
sed -i 's/#Port 22/Port 33333/g' /etc/ssh/sshd_config 
#更改ssh端口为3333

2.禁止root登录,新建普通用户登录,登录后可su -转入root账户,让恶意登录者无法猜测用户名。

useradd onovps #新建用户名
passwd onovps #设置密码
sed -i 's/#PermitRootLogin yes/PermitRootLogin no/g' /etc/ssh/sshd_config
#禁止root登录
service sshd restart #重启ssh服务生效

3.限制登录失败次数并锁定

vim /etc/pam.d/login

在#%PAM-1.0下面添加:

auth required pam_tally2.so deny=5 unlock_time=180 #登录失败5次锁定180秒,不包含root
auth required pam_tally2.so deny=5 unlock_time=180 even_deny_root root_unlock_time=180 #包含root

4.允许特定的用户登录,编辑ssh配置文件:

vim /etc/ssh/sshd_config 
AllowUsers user 
#默认允许全部,多个用户以空格隔开,也可拒绝特定用户登录。
DenyUsers user

5.设置重复验证次数,默认3次:

MaxAuthTries 0
#错误一次即断开连接

6.直接用Iptables封闭ssh端口,为ssh服务器设置开门钥匙,有此其它都是浮云啦。。。。
一般做这些设置就足够了,也可设置为禁用密码用密钥登录,不同客户端方法不同,以后再写吧。

分类
最新文章
最近回复
  • liyk: 这个方法获取的IPv6大概20分钟之后就会失效,默认路由先消失,然后Global IPV6再消失
  • 海运: 不好意思,没有。
  • zongboa: 您好,請問一下有immortalwrt設定guest Wi-Fi的GUI教學嗎?感謝您。
  • 海运: 恩山有很多。
  • swsend: 大佬可以分享一下固件吗,谢谢。
  • Jimmy: 方法一 nghtp3步骤需要改成如下才能编译成功: git clone https://git...
  • 海运: 地址格式和udpxy一样,udpxy和msd_lite能用这个就能用。
  • 1: 怎么用 编译后的程序在家里路由器内任意一台设备上运行就可以吗?比如笔记本电脑 m参数是笔记本的...
  • 孤狼: ups_status_set: seems that UPS [BK650M2-CH] is ...
  • 孤狼: 擦。。。。apcupsd会失联 nut在冲到到100的时候会ONBATT进入关机状态,我想想办...