海运的博客

Windows下用EvtSys发送日志到syslog-ng服务器

发布时间:June 21, 2012 // 分类:Cacti,日记分析 // 2 Comments

之前有介绍cacti配合syslog-ng构建中央日志服务器,对于Linux服务器可以直接将日志通过网络发送到syslog-ng服务端,Windows下要利用EvtSys这个小工具转换日记为syslog格式并发送到syslog-ng服务器。
EvtSys官方下载地址:http://code.google.com/p/eventlog-to-syslog/downloads/list,支持windows2003和windows2008系统。
将下载的文件解压复制到C:\WINDOWS\SYSTEM32目录下,打开cmd窗口执行:

#https://www.haiyun.me
evtsys -i -h server
-i ;安装为系统服务
-h ;syslog-ng服务器地址
-p ;syslog-ng服务器端口,默认514

启动EvtSys:

net start evtsys

然后在syslog管理界面就可查看windows server日志信息了。

McAfee8.5i、8.7i、8.8企业版官方下载

发布时间:June 7, 2012 // 分类:常用软件 // No Comments

访问Mcafee产品下载页面:http://www.mcafee.com/cn/downloads/downloads.aspx
输入授权号:

3048901-NAI

2012.11.13更新:

5000636-NAI
5000363-NAI

2017.02.23更新:

6240017-NAI
6240018-NAI

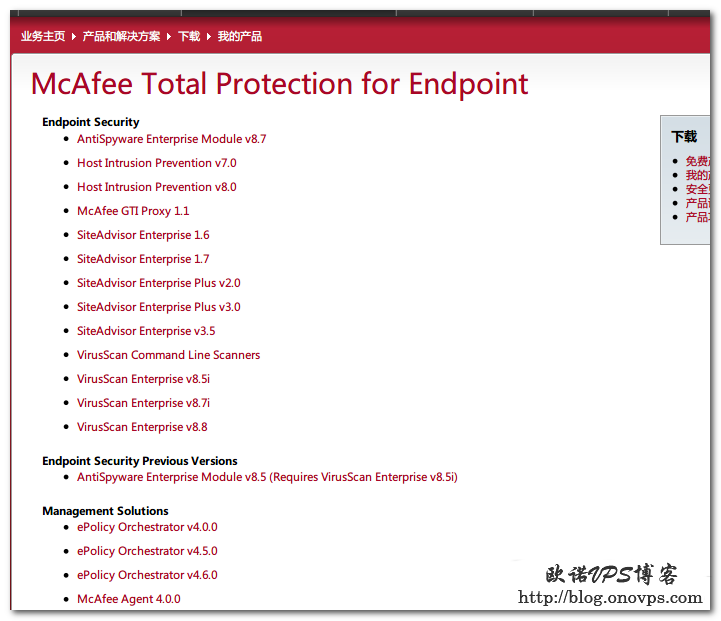
进入下载页面,选择相应的版本下载:
mcafee产品下载.png

Windows 2008R2以ISAPI和Fastcgi方式安装配置IIS、PHP、Mysql环境

发布时间:May 26, 2012 // 分类:IIS // No Comments

WindowsPHP有两个版本,非线程安全及线程安全版本,运行方式可选ISAPI、Fastcgi、CGI。

1.Non Thread Safe版本php适用于以CGI以和fastCGI运行的web服务器上。
2.Thread Safe版本php适用在于ISAPI或者module的web服务器上,如IIS的ISAPI模式或者apache module模式。
备注:安装Zend Optimizer需选择线程安全版。

本文以线程安全版为例,下载解压:http://windows.php.net/downloads/releases/php-5.2.17-Win32-VC6-x86.zip
进入PHP目录,更改php.ini-recommended为php.ini,修改或添加:

#https://www.haiyun.me
extension_dir = "c:\php\ext"
cgi.force_redirect = 0
cgi.fix_pathinfo=1
fastcgi.impersonate = 1
extension=php_gd2.dll
extension=php_mbstring.dll
extension=php_gettext.dll
extension=php_mcrypt.dll
extension=php_mhash.dll
extension=php_mime_magic.dll
extension=php_mysql.dll
extension=php_mysqli.dll
extension=php_xmlrpc.dll
extension=php_zip.dll

配置IIS支持PHP:
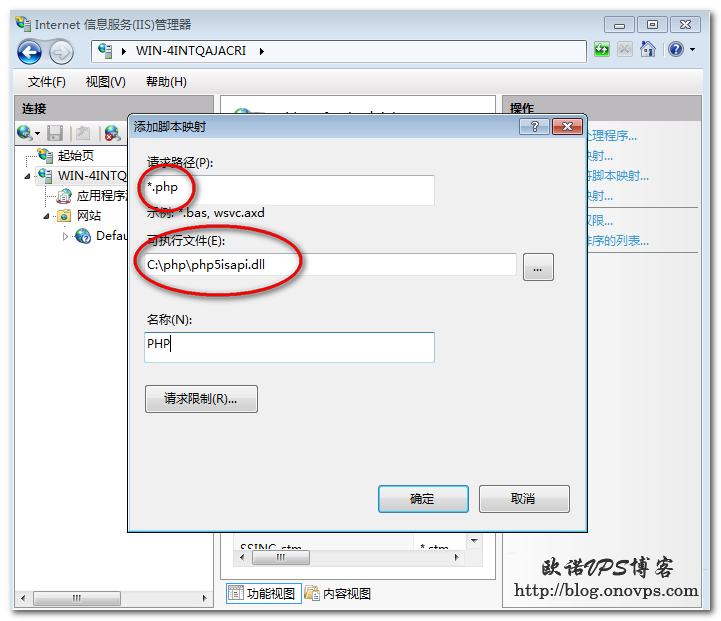
1.以ISAPI方式运行:
IIS管理器——处理程序眏射——添加脚本眏射:
IIS添加PHP-ISAPI脚本眏射.png
应用程序池要开启32位模式,不然提示404请求的内容似乎是脚本,因而将无法由静态文件处理程序来处理。
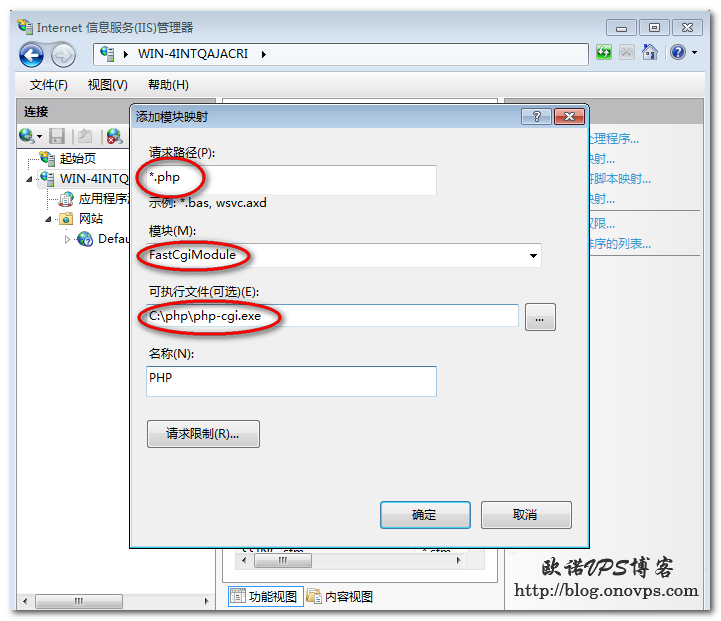
2.以Fastcgi方式运行:
IIS管理器——处理程序眏射——添加模块眏射:
IIS7配置Fastcgi方式运行php.png
注意:ISAP和Fastcgi不能同时启用,Fastcgi性能更优。
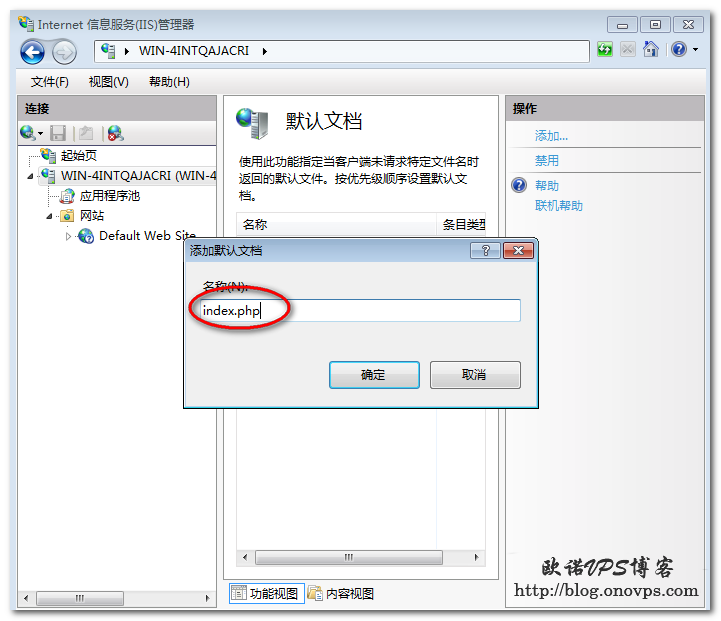
添加默认文档:index.php
IIS7添加默认文档index.php.png
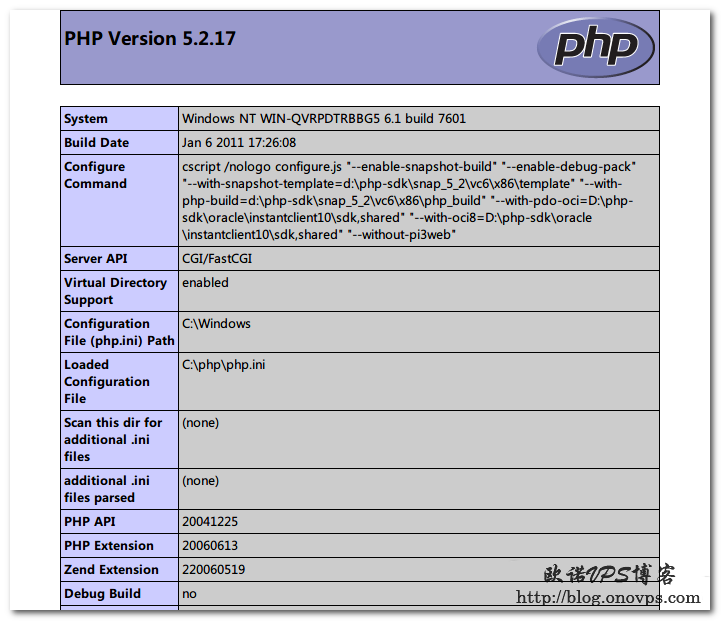
重新启动IIS,新建phpinfo测试:

<?php
phpinfo();
?>

IIS7测试phpinfo信息.png

Windows下查看打开指定文件的程序

发布时间:May 4, 2012 // 分类:Windows // No Comments

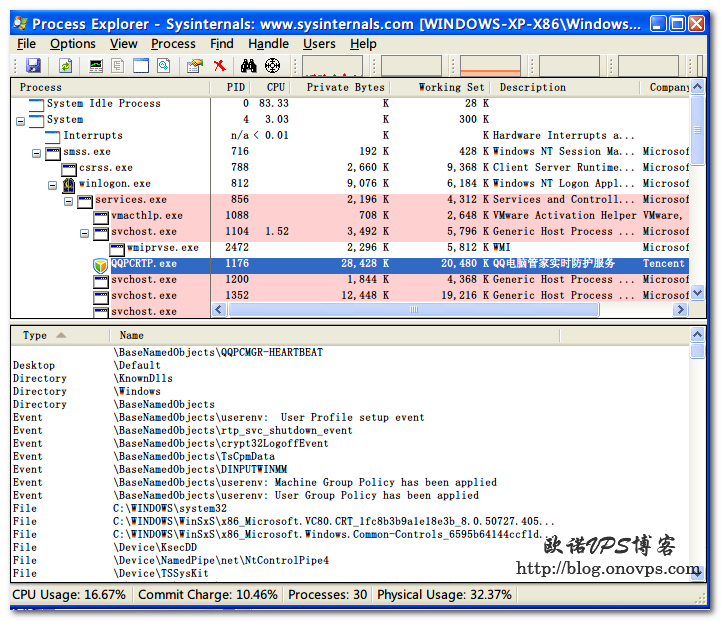
有时我们需要查看指定文件有哪个进程在打开,或指定进程都打开了哪些文件,在Linux下可通过lsof或fuser查看,Windows下可通过微软官方提供的ProcessExplorer查看。
ProcessExplorer打开会显示当前系统运行中的进程,点击进程在下方会显示其调用的文件。
ProcessExplorer界面.png
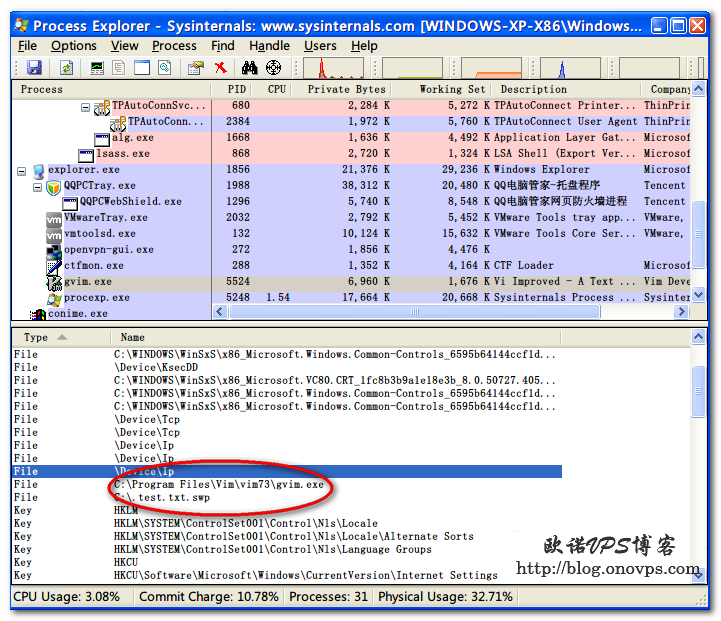
测试查找打开文件的进程,在C盘根目录新那个test.txt文件用vim打开,然后打开ProcessExplorer——>Find——输入test.txt,查找结果如下:
ProcessExplorer查找.png

Putty小工具Plink妙用

发布时间:May 1, 2012 // 分类:Windows // No Comments

提及Putty大家都不陌生,Putty自带的工具Plink同样强大,本文就简单介绍下几种用法。
Plink使用参数:

Usage: plink [options] [user@]host [command]
Options:
  -V        print version information and exit
  -pgpfp    print PGP key fingerprints and exit
  -v        show verbose messages
  -load sessname  Load settings from saved session
  -ssh -telnet -rlogin -raw -serial
            force use of a particular protocol
  -P port   connect to specified port
  -l user   connect with specified username
  -batch    disable all interactive prompts
The following options only apply to SSH connections:
  -pw passw login with specified password
  -D [listen-IP:]listen-port
            Dynamic SOCKS-based port forwarding
  -L [listen-IP:]listen-port:host:port
            Forward local port to remote address
  -R [listen-IP:]listen-port:host:port
            Forward remote port to local address
  -X -x     enable / disable X11 forwarding
  -A -a     enable / disable agent forwarding
  -t -T     enable / disable pty allocation
  -1 -2     force use of particular protocol version
  -4 -6     force use of IPv4 or IPv6
  -C        enable compression
  -i key    private key file for authentication
  -noagent  disable use of Pageant
  -agent    enable use of Pageant
  -m file   read remote command(s) from file
  -s        remote command is an SSH subsystem (SSH-2 only)
  -N        don't start a shell/command (SSH-2 only)
  -nc host:port
            open tunnel in place of session (SSH-2 only)
  -sercfg configuration-string (e.g. 19200,8,n,1,X)
            Specify the serial configuration (serial only)

1.动态转发端口,可用于代*理上网哦。

plink -N -D 127.0.0.1:7070 root@192.168.1.2 -pw passwd

2.转发本地端口到远程服务器

plink -N -L 127.0.0.1:2222:google.com:80 root@haiyun.me -pw passwd
#通过haiyun.me将本地2222端口转发google.com 80端口,浏览器打开127.0.0.1:2222就是谷歌网站

3.登录ssh服务器并依次执行文件内的命令。

plink -m cmd.txt root@www.haiyun.me -pw passwd

4.内网穿透,转发远程服务器端口到本地端口,远程监听指定地址查看:https://www.haiyun.me/archives/1010.html

plink -N -R 0.0.0.0:2222:localhost:3389 root@haiyun.me -pw passwd
#转发haiyun.me 2222端口到本地3389端口
分类
最新文章
最近回复
  • 海运: 恩山有很多。
  • swsend: 大佬可以分享一下固件吗,谢谢。
  • Jimmy: 方法一 nghtp3步骤需要改成如下才能编译成功: git clone https://git...
  • 海运: 地址格式和udpxy一样,udpxy和msd_lite能用这个就能用。
  • 1: 怎么用 编译后的程序在家里路由器内任意一台设备上运行就可以吗?比如笔记本电脑 m参数是笔记本的...
  • 孤狼: ups_status_set: seems that UPS [BK650M2-CH] is ...
  • 孤狼: 擦。。。。apcupsd会失联 nut在冲到到100的时候会ONBATT进入关机状态,我想想办...
  • 海运: 网络,找到相应的url编辑重发请求,firefox有此功能,其它未知。
  • knetxp: 用浏览器F12网络拦截或监听后编辑重发请求,修改url中的set为set_super,将POS...
  • Albert: 啊啊啊啊啊啊啊啊啊 我太激动了,终于好了英文区搜索了半天,翻遍了 pve 论坛没找到好方法,博...