海运的博客

Centos安装Freeradius+daloRADIUS配合ROS PPPOE验证

发布时间:July 27, 2012 // 分类:RADIUS,ROS // 3 Comments

之前有介绍安装Radiusmanager做为ROS验证服务器,不过Radiusmanager为商业软件,喜欢开源软件的可使用daloRADIUS替代,功能同样强大。
LAMP环境安装:

yum -y install httpd httpd-devel mysql mysql-server mysql-devel
yum -y install php php-devel php-mysql php-common php-gd php-mbstring php-mcrypt php-xml
/etc/init.d/httpd start
/etc/init.d/mysqld start
chkconfig httpd on
chkconfig mysqld on
mysqladmin -u root password 'newpassowrd'

Freeradius安装:

yum install freeradius2 freeradius2-mysql freeradius2-utils
/etc/init.d/radiusd start
chkconfig radiusd on

测试Freeradius:

radiusd -X
Listening on authentication address * port 1812
Listening on accounting address * port 1813
Listening on command file /var/run/radiusd/radiusd.sock
Listening on authentication address 127.0.0.1 port 18120 as server inner-tunnel
Listening on proxy address * port 1814
Ready to process requests.

配置Freeradius支持sql:

cat /etc/raddb/radiusd.conf 
$INCLUDE sql.conf #调用sql.conf配置,去除之前的#
cat /etc/raddb/sites-enabled/default #下两段中添加sql
authorize {
    preprocess
    chap
    mschap
    digest
    suffix
    eap {
        ok = return
    }
    files
    sql
    expiration
    logintime
    pap
}
accounting {
    detail
    unix
    radutmp
    sql
    exec
    attr_filter.accounting_response
}

设置Freeradius sql连接信息:

cat /etc/raddb/sql.conf 
    database = "mysql"
    driver = "rlm_sql_${database}"
    server = "localhost"
    #port = 3306
    login = "radius"
    password = "radiupass"
      radius_db = "radius"

安装DaloRADIUS

wget http://downloads.sourceforge.net/project/daloradius/daloradius/daloradius0.9-9/daloradius-0.9-9.tar.gz
tar zxvf daloradius-0.9-9.tar.gz 
mv daloradius-0.9-9 /var/www/html/daloradius
chown -R apache:apache /var/www/html/daloradius

创建数据库并导入:

mysql -u root -p
mysql>create database radius;
mysql>grant all on radius.* to radius@localhost identified by "radpass"; 
mysql>exit;
mysql -uroot -p radius < /var/www/html/daloradius/contrib/db/mysql-daloradius.sql 
mysql -uroot -p radius < /var/www/html/daloradius/contrib/db/fr2-mysql-daloradius-and-freeradius.sql 

配置DaloRADIUS:

cat cat /var/www/html/daloradius/library/daloradius.conf.php
$configValues['CONFIG_DB_ENGINE'] = 'mysql';
$configValues['CONFIG_DB_HOST'] = 'localhost';
$configValues['CONFIG_DB_PORT'] = '3306';
$configValues['CONFIG_DB_USER'] = 'radius';
$configValues['CONFIG_DB_PASS'] = 'radpass';
$configValues['CONFIG_DB_NAME'] = 'radius';
$configValues['CONFIG_PATH_DALO_VARIABLE_DATA'] = '/var/www/daloradius/var'; #如在别目录需修改

添加RADIUS客户端:

cat /etc/raddb/clients.conf
client 192.168.1.21 {
    secret        = root
    shortname    = ROS
}

通过浏览器访问www.haiyun.me/daloradius即可登录管理,默认账号:administrator,密码:radius。
Daloradius新建用户测试,ROS端配置RADIUS请参考:安装Radiusmanager做为ROS验证服务器
daloradius添加用户.png
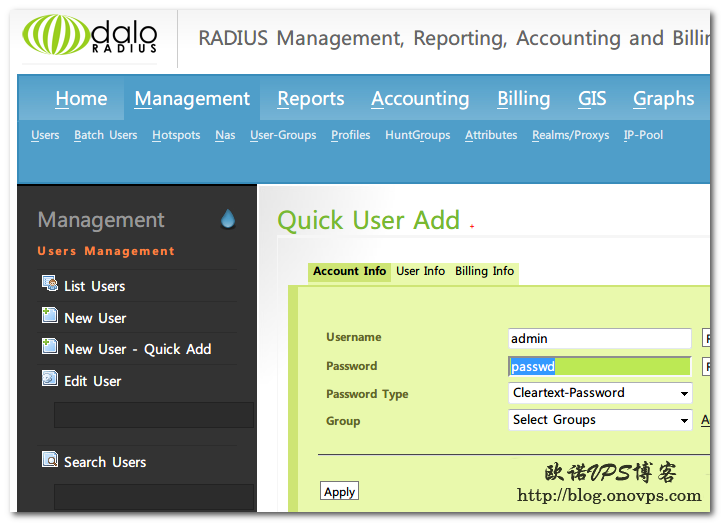
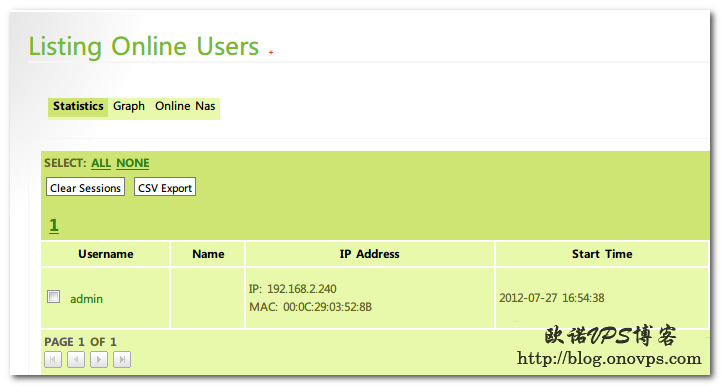
通过Daloradius管理界面可查看在线用户:
daloradius在线用户.png

Centos配置LVS Keepalived高可用负载均衡服务器

发布时间:July 18, 2012 // 分类:高可用 // No Comments

LVS IP信息:

主LVS:192.168.1.2
备LVS:192.168.1.3
虚拟IP:192.168.1.6
应用服务器1:192.168.1.12
应用服务器2:192.168.1.13

查看内核是否支持LVS模块:

modprobe -l |grep ipvs
/lib/modules/2.6.18-274.17.1.el5/kernel/net/ipv4/ipvs/ip_vs.ko
/lib/modules/2.6.18-274.17.1.el5/kernel/net/ipv4/ipvs/ip_vs_dh.ko
/lib/modules/2.6.18-274.17.1.el5/kernel/net/ipv4/ipvs/ip_vs_ftp.ko
/lib/modules/2.6.18-274.17.1.el5/kernel/net/ipv4/ipvs/ip_vs_lblc.ko
/lib/modules/2.6.18-274.17.1.el5/kernel/net/ipv4/ipvs/ip_vs_lblcr.ko
/lib/modules/2.6.18-274.17.1.el5/kernel/net/ipv4/ipvs/ip_vs_lc.ko
/lib/modules/2.6.18-274.17.1.el5/kernel/net/ipv4/ipvs/ip_vs_nq.ko
/lib/modules/2.6.18-274.17.1.el5/kernel/net/ipv4/ipvs/ip_vs_rr.ko
/lib/modules/2.6.18-274.17.1.el5/kernel/net/ipv4/ipvs/ip_vs_sed.ko
/lib/modules/2.6.18-274.17.1.el5/kernel/net/ipv4/ipvs/ip_vs_sh.ko
/lib/modules/2.6.18-274.17.1.el5/kernel/net/ipv4/ipvs/ip_vs_wlc.ko
/lib/modules/2.6.18-274.17.1.el5/kernel/net/ipv4/ipvs/ip_vs_wrr.ko

根据内核版本下载安装相应的ipvsadm:

ln -s /usr/src/kernels/2.6.18-274.17.1.el5-x86_64/ /usr/src/linux
wget http://www.linuxvirtualserver.org/software/kernel-2.6/ipvsadm-1.24.tar.gz
tar zxvf ipvsadm-1.24.tar.gz
cd ipvsadm-1.24
make
make install

也可使用yum直接安装:

yum install ipvsadm

安装Keepalived:

wget http://www.keepalived.org/software/keepalived-1.1.19.tar.gz
tar zxvf keepalived-1.1.19.tar.gz 
cd keepalived-1.1.19
./configure --sysconf=/etc/ --with-kernel-dir=/usr/src/kernels/2.6.18-274.17.1.el5-x86_64/
make
make install
ln -s /usr/local/sbin/keepalived /sbin/keepalived

主LVS配置keepalived:

! Configuration File for keepalived

global_defs {
   notification_email {
     admin@www.haiyun.me
   }
   notification_email_from Alexandre.Cassen@firewall.loc
   smtp_server 127.0.0.1
   smtp_connect_timeout 30
   router_id LVS_DEVEL
}

vrrp_instance VI_1 {
    state MASTER
    interface eth0
    virtual_router_id 51
    priority 100
    advert_int 1
    authentication {
        auth_type PASS
        auth_pass 1111
    }
    virtual_ipaddress {
        192.168.1.6
    }
}

virtual_server 192.168.1.6 80 {
    delay_loop 6
    lb_algo rr
    lb_kind NAT
    nat_mask 255.255.255.0
    persistence_timeout 50
    protocol TCP

    real_server 192.168.1.12 80 {
        weight 1
        TCP_CHECK {
            connect_timeout 3
            nb_get_retry 3
            delay_before_retry 3
        }
    }

    real_server 192.168.1.13 80 {
        weight 1
        TCP_CHECK {
            connect_timeout 3
            nb_get_retry 3
            delay_before_retry 3
        }
    } 
}

启动keepalived,同时会在主LVS绑定VIP:

/etc/init.d/keepalived start
ip add show eth0
2: eth0: <BROADCAST,MULTICAST,UP,LOWER_UP> mtu 1500 qdisc pfifo_fast qlen 1000
    link/ether 00:0c:29:e7:cc:3b brd ff:ff:ff:ff:ff:ff
    inet 192.168.1.3/24 brd 192.168.1.255 scope global eth0
    inet 192.168.1.6/32 scope global eth0

查看当前LVS参数:

ipvsadm -L
IP Virtual Server version 1.2.1 (size=4096)
Prot LocalAddress:Port Scheduler Flags
  -> RemoteAddress:Port           Forward Weight ActiveConn InActConn
TCP  192.168.1.6:http rr
  -> 192.168.1.12:http            Route   1      0          0         
  -> 192.168.1.13:http            Route   1      0          0      

复制主keepalived到备LVS,修改以下参数:

state BACKUP
priority 90

应用服务器增加虚拟VIP:

#!/bin/bash
VIP=192.168.1.6
. /etc/rc.d/init.d/functions
case "$1" in
start)
ifconfig lo:0 $VIP netmask 255.255.255.255 broadcast $SNS
echo "1" >/proc/sys/net/ipv4/conf/lo/arp_ignore
echo "2" >/proc/sys/net/ipv4/conf/lo/arp_announce
echo "1" >/proc/sys/net/ipv4/conf/all/arp_ignore
echo "2" >/proc/sys/net/ipv4/conf/all/arp_announce
sysctl -p >/dev/null 2>&1
echo "RealServer Start OK"
;;
stop)
ifconfig lo:0 down
echo "0" >/proc/sys/net/ipv4/conf/lo/arp_ignore
echo "0" >/proc/sys/net/ipv4/conf/lo/arp_announce
echo "0" >/proc/sys/net/ipv4/conf/all/arp_ignore
echo "0" >/proc/sys/net/ipv4/conf/all/arp_announce
echo "RealServer Stoped"
;;
*)
echo "Usage: $0 {start|stop}"
exit 1
esac

测试LVS故障切换,停止主LVS上keepalived服务:

/etc/init.d/keepalived stop

查看备LVS已经接管为主LVS:

tail -n 10 /var/log/message
Jul 14 20:30:28 centos5 Keepalived_vrrp: VRRP_Instance(VI_1) Transition to MASTER STATE
Jul 14 20:30:29 centos5 Keepalived_vrrp: VRRP_Instance(VI_1) Entering MASTER STATE
Jul 14 20:30:29 centos5 Keepalived_vrrp: VRRP_Instance(VI_1) setting protocol VIPs.
Jul 14 20:30:29 centos5 Keepalived_vrrp: VRRP_Instance(VI_1) Sending gratuitous ARPs on eth0 for 192.168.1.6

应用服务器故障测试,停止其中之一httpd服务:

/etc/init.d/httpd stop

查看keepalved日志已将出错服务器移除并邮件报警:

tail -n 10 /var/log/message
Jul 14 21:36:18 centos5 Keepalived_healthcheckers: TCP connection to [192.168.1.12:80] failed !!!
Jul 14 21:36:18 centos5 Keepalived_healthcheckers: Removing service [192.168.1.12:80] from VS [192.168.1.6:80]
Jul 14 21:36:18 centos5 Keepalived_healthcheckers: Remote SMTP server [127.0.0.1:25] connected.
ipvsadm -L
IP Virtual Server version 1.2.1 (size=4096)
Prot LocalAddress:Port Scheduler Flags
  -> RemoteAddress:Port           Forward Weight ActiveConn InActConn
TCP  192.168.1.6:http rr
  -> 192.168.1.13:http            Route   1      0          0    

Centos5.8安装集中自动化管理工具Puppet

发布时间:July 3, 2012 // 分类:Puppet // No Comments

Puppet以C/S方式运行,客户端连接读取服务器端的配置并在本机执行,极大方便多服务器情况下的重复管理工作。
安装Puppet的主机要有完整的域名,可设置主机名或DNS,多服务器同步对时钟要求严格,最好安装ntp自动对时。
Puppet服务器端安装:

yum install puppet-server ntp
hostname master.www.haiyun.me
ntpdate pool.ntp.org
/etc/init.d/puppetmaster start
chkconfig puppetmaster on

Puppet客户器端安装:

yum install puppet ntp
hostname node1.www.haiyun.me
ntpdate pool.ntp.org
/etc/init.d/puppet start
chkconfig puppet on
echo "192.168.1.2 master.www.haiyun.me" >> /etc/hosts

服务器端如有开启Iptables需开启puppet端口:

iptables -A INPUT -p tcp -dport 8140 -j ACCEPT

客户端与服务器端同步SSL证书:

puppetd --server master.www.haiyun.me --test

服务器端签核证书:

puppetca --list
puppetca -s node1.www.haiyun.me
#puppetca -s -a 签核所有证书请求

可配置特定主机名自动通过认证:

echo "*.www.haiyun.me" >> /etc/puppet/autosign.conf

服务器端新建配置同步到客户端执行测试:

vim /etc/puppet/manifests/site.pp
node default {
        file {
                "/tmp/test.txt": content => "hello, puppet",
                 owner => root,
                 group => root,
                 mode => 644;
        }
}

客户端同步测试:

puppetd --server master.www.haiyun.me --test

查看/tmp目录,有新建test.txt文件,权限644,用户root。

ls -a /tmp/
-rw-r--r--  1 root root      12 07-03 16:54 test.txt

注:如果服务器端配置文件错误,客户端执行后可能会锁定进程并提示:

notice: Run of Puppet configuration client already in progress; skipping 

解决:

rm /var/lib/puppet/state/puppetdlock

Linux/Centos安装nagios监控服务器

发布时间:June 3, 2012 // 分类:Nagios // No Comments

CentOS安装LAMP及编译环境:

yum -y install httpd httpd-devel mysql mysql-server mysql-devel php php-devel php-common php-gd \
php-mysql php-mbstring php-mcrypt php-xml php-snmp gcc make automake autoconf
/etc/init.d/httpd start
/etc/init.d/mysqld start
/usr/bin/mysqladmin -u root password "password"
chkconfig httpd on
chkconfig mysqld on

安装Nagios

#https://www.haiyun.me
useradd nagios
groupadd nagcmd
usermod -G nagcmd nagios
usermod -G nagcmd apache
cd /usr/local/src/
#安装主程序
wget http://prdownloads.sourceforge.net/sourceforge/nagios/nagios-3.4.1.tar.gz
tar zxvf nagios-3.4.1.tar.gz 
cd nagios
./configure --with-command-group=nagcmd --prefix=/usr/local/nagios --with-nagios-user=nagios --with-nagios-group=nagios 
make all
make install
#安装主程序
make install-init
#安装init管理脚本
make install-config
#安装示例配置文件
make install-commandmode
#配置目录权限
make install-webconf
#安装Apache配置文件
#make install-exfoliation
#安装简洁白色主题,此为默认
make install-classicui
安装经典黑色主题
cd ../
#安装插件
wget http://prdownloads.sourceforge.net/sourceforge/nagiosplug/nagios-plugins-1.4.15.tar.gz
tar zxvf nagios-plugins-1.4.15.tar.gz
cd nagios-plugins
./configure --with-nagios-user=nagios --with-nagios-group=nagios --prefix=/usr/local/nagios
make
make install
htpasswd -c /usr/local/nagios/etc/htpasswd.users nagiosadmin
#生成nagiosadmin验证密码,用于web界面验证。
/etc/init.d/httpd restart
/etc/init.d/nagios start
chkconfig nagios on
setsebool -P httpd_disable_trans 1
#关闭selinux对httpd的防护,不然会出现权限问题

安装完成,访问www.haiyun.me/nagios即可。
nagios管理界面.png

Centos下关闭SELinux的方法

发布时间:June 3, 2012 // 分类:Linux基础 // No Comments

查看SELinux状态:

getenforce 

临时关闭SELinux:

setenforce 0

CentOS下永久关闭SELinux:

sed -i 's/SELINUX=enforcing/SELINUX=disabled/g' /etc/selinux/config

或在引导时关闭SELinux,编辑grub配置添加:

selinux=0
分类
最新文章
最近回复
  • 海运: 恩山有很多。
  • swsend: 大佬可以分享一下固件吗,谢谢。
  • Jimmy: 方法一 nghtp3步骤需要改成如下才能编译成功: git clone https://git...
  • 海运: 地址格式和udpxy一样,udpxy和msd_lite能用这个就能用。
  • 1: 怎么用 编译后的程序在家里路由器内任意一台设备上运行就可以吗?比如笔记本电脑 m参数是笔记本的...
  • 孤狼: ups_status_set: seems that UPS [BK650M2-CH] is ...
  • 孤狼: 擦。。。。apcupsd会失联 nut在冲到到100的时候会ONBATT进入关机状态,我想想办...
  • 海运: 网络,找到相应的url编辑重发请求,firefox有此功能,其它未知。
  • knetxp: 用浏览器F12网络拦截或监听后编辑重发请求,修改url中的set为set_super,将POS...
  • Albert: 啊啊啊啊啊啊啊啊啊 我太激动了,终于好了英文区搜索了半天,翻遍了 pve 论坛没找到好方法,博...