Nginx配置判断来路referer如果为*.www.haiyun.me返回403:
if ($http_referer ~* .*\.www.haiyun.me){
return 403;
}
判断用户user_agent如果为NSPlayer返回403:
if ($http_user_agent ~* NSPlayer.*){
return 403;
}
根据访客IP做限制:
if ($remote_addr != "192.168.1.5"){
    return 403;
} 发布时间:June 2, 2012 // 分类:Nginx // No Comments
Nginx配置判断来路referer如果为*.www.haiyun.me返回403:
if ($http_referer ~* .*\.www.haiyun.me){
return 403;
}判断用户user_agent如果为NSPlayer返回403:
if ($http_user_agent ~* NSPlayer.*){
return 403;
}根据访客IP做限制:
if ($remote_addr != "192.168.1.5"){
return 403;
} 发布时间:June 1, 2012 // 分类:Nagios // No Comments
首先Nginx需添加perl-fastcgi支持,请参考:https://www.haiyun.me/archives/nginx-perl-fastcgi.html
安装Nagios:
#https://www.haiyun.me
useradd nagios
groupadd nagcmd
usermod -G nagcmd nagios
usermod -G nagcmd www
cd /usr/local/src/
wget http://prdownloads.sourceforge.net/sourceforge/nagios/nagios-3.4.1.tar.gz
tar zxvf nagios-3.4.1.tar.gz
cd nagios
./configure --with-command-group=nagcmd --prefix=/usr/local/nagios --with-nagios-user=nagios --with-nagios-group=nagios
make all
make install
make install-init
make install-config
make install-commandmode
cd ../
wget http://prdownloads.sourceforge.net/sourceforge/nagiosplug/nagios-plugins-1.4.15.tar.gz
tar zxvf nagios-plugins-1.4.15.tar.gz
cd nagios-plugins
./configure --with-nagios-user=nagios --with-nagios-group=nagios --prefix=/usr/local/nagios
make
make install
ln -s  /usr/local/nagios/share/  /home/wwwroot/nagios.www.haiyun.me
/etc/init.d/nagios start
Nginx配置:
server
    {
        listen       80;
        server_name nagios.www.haiyun.me;
        root  /home/wwwroot/nagios.www.haiyun.me;
                index index.php;

                auth_basic "Login";
                auth_basic_user_file /home/wwwroot/nagios.www.haiyun.me/passwd;
                location ~ .*\.cgi?$
                {
                root /usr/local/nagios/sbin;
                rewrite ^/nagios/cgi-bin/(.*)\.cgi /$1.cgi break;
                fastcgi_pass  unix:/tmp/perl-fastcgi.sock;
                fastcgi_index index.cgi;
                fastcgi_param   SCRIPT_FILENAME  $document_root$fastcgi_script_name;
                include         fastcgi_params;
                }
                location ~ .*\.(php|php5)?$
                        {
                                fastcgi_pass  unix:/tmp/php-cgi.sock;
                                fastcgi_index index.php;
                                include fcgi.conf;
                        }
                access_log none;
}
配置Nginx验证:
perl -e 'print crypt($ARGV[0], "pwdsalt")' passwd;echo
#生成passwd加密字符,将结果以user:passwd的方式填入/home/wwwroot/nagios.www.haiyun.me/passwd发布时间:May 31, 2012 // 分类:Nginx // 8 Comments
安装perl-fcgi模块,有安装epel源可使用yum安装:
yum -y install perl-FCGI编译安装:
wget http://search.cpan.org/CPAN/authors/id/F/FL/FLORA/FCGI-0.74.tar.gz
tar zxvf FCGI-0.74.tar.gz
cd FCGI-0.74
perl Makefile.PL
make
make install
新建perl脚本用做fastcgi进程管理,保存为/usr/bin/perl-fastcgi.pl
#!/usr/bin/perl

use FCGI;
use Socket;
use POSIX qw(setsid);

require 'syscall.ph';

&daemonize;

#this keeps the program alive or something after exec'ing perl scripts
END() { } BEGIN() { }
*CORE::GLOBAL::exit = sub { die "fakeexit\nrc=".shift()."\n"; };
eval q{exit};
if ($@) {
    exit unless $@ =~ /^fakeexit/;
};

&main;

sub daemonize() {
    chdir '/'                 or die "Can't chdir to /: $!";
    defined(my $pid = fork)   or die "Can't fork: $!";
    exit if $pid;
    setsid                    or die "Can't start a new session: $!";
    umask 0;
}

sub main {
    #$socket = FCGI::OpenSocket( "127.0.0.1:8999", 10 ); #use IP sockets
        $socket = FCGI::OpenSocket( "/tmp/perl-fastcgi.sock", 10 ); #use IP sockets
        $request = FCGI::Request( \*STDIN, \*STDOUT, \*STDERR, \%req_params, $socket );
        if ($request) { request_loop()};
            FCGI::CloseSocket( $socket );
}

sub request_loop {
        while( $request->Accept() >= 0 ) {

           #processing any STDIN input from WebServer (for CGI-POST actions)
           $stdin_passthrough ='';
           $req_len = 0 + $req_params{'CONTENT_LENGTH'};
           if (($req_params{'REQUEST_METHOD'} eq 'POST') && ($req_len != 0) ){
                my $bytes_read = 0;
                while ($bytes_read < $req_len) {
                        my $data = '';
                        my $bytes = read(STDIN, $data, ($req_len - $bytes_read));
                        last if ($bytes == 0 || !defined($bytes));
                        $stdin_passthrough .= $data;
                        $bytes_read += $bytes;
                }
            }

            #running the cgi app
            if ( (-x $req_params{SCRIPT_FILENAME}) &&  #can I execute this?
                 (-s $req_params{SCRIPT_FILENAME}) &&  #Is this file empty?
                 (-r $req_params{SCRIPT_FILENAME})     #can I read this file?
            ){
        pipe(CHILD_RD, PARENT_WR);
        my $pid = open(KID_TO_READ, "-|");
        unless(defined($pid)) {
            print("Content-type: text/plain\r\n\r\n");
                        print "Error: CGI app returned no output - ";
                        print "Executing $req_params{SCRIPT_FILENAME} failed !\n";
            next;
        }
        if ($pid > 0) {
            close(CHILD_RD);
            print PARENT_WR $stdin_passthrough;
            close(PARENT_WR);

            while(my $s = <KID_TO_READ>) { print $s; }
            close KID_TO_READ;
            waitpid($pid, 0);
        } else {
                    foreach $key ( keys %req_params){
                       $ENV{$key} = $req_params{$key};
                    }
                    # cd to the script's local directory
                    if ($req_params{SCRIPT_FILENAME} =~ /^(.*)\/[^\/]+$/) {
                            chdir $1;
                    }

            close(PARENT_WR);
            close(STDIN);
            #fcntl(CHILD_RD, F_DUPFD, 0);
            syscall(&SYS_dup2, fileno(CHILD_RD), 0);
            #open(STDIN, "<&CHILD_RD");
            exec($req_params{SCRIPT_FILENAME});
            die("exec failed");
        }
            }
            else {
                print("Content-type: text/plain\r\n\r\n");
                print "Error: No such CGI app - $req_params{SCRIPT_FILENAME} may not ";
                print "exist or is not executable by this process.\n";
            }

        }
}
新建init脚本,用于管理perl-fastcgi,保存为/etc/init.d/perl-fastcgi
#!/bin/sh
#
# nginx – this script starts and stops the nginx daemon
#
# chkconfig: - 85 15
# description: Nginx is an HTTP(S) server, HTTP(S) reverse \
# proxy and IMAP/POP3 proxy server
# processname: nginx
# config: /opt/nginx/conf/nginx.conf
# pidfile: /opt/nginx/logs/nginx.pid

# Source function library.
. /etc/rc.d/init.d/functions

# Source networking configuration.
. /etc/sysconfig/network

# Check that networking is up.
[ "$NETWORKING" = "no" ] && exit 0

perlfastcgi="/usr/bin/perl-fastcgi.pl"
prog=$(basename perl)

lockfile=/var/lock/subsys/perl-fastcgi

start() {
    [ -x $perlfastcgi ] || exit 5
    echo -n $"Starting $prog: "
    daemon $perlfastcgi
    retval=$?
    echo
    [ $retval -eq 0 ] && touch $lockfile
    return $retval
}

stop() {
    echo -n $"Stopping $prog: "
    killproc $prog -QUIT
    retval=$?
    echo
    [ $retval -eq 0 ] && rm -f $lockfile
    return $retval
}

restart() {
    stop
    start
}

reload() {
    echo -n $”Reloading $prog: ”
    killproc $nginx -HUP
    RETVAL=$?
    echo
}

force_reload() {
    restart
}
rh_status() {
    status $prog
}

rh_status_q() {
    rh_status >/dev/null 2>&1
}

case "$1" in
    start)
        rh_status_q && exit 0
        $1
        ;;
    stop)
        rh_status_q || exit 0
        $1
        ;;
    restart)
        $1
        ;;
    reload)
        rh_status_q || exit 7
        $1
        ;;
    force-reload)
        force_reload
        ;;
    status)
        rh_status
        ;;
    condrestart|try-restart)
        rh_status_q || exit 0
        ;;
    *)
        echo $"Usage: $0 {start|stop|status|restart|condrestart|try-restart|reload|force-reload}"
        exit 2
    esac
启动perl-fastcgi进程:
chmod +x /usr/bin/perl-fastcgi.pl
chmod 755 /etc/init.d/perl-fastcgi
/etc/init.d/perl-fastcgi start
chkconfig perl-fastcgi on
Nginx配置:
server
    {
        listen       80;
        server_name www.haiyun.me;
        index index.pl index.html;
        root  /home/wwwroot/www.haiyun.me;

                location ~ .*\.(pl|cgi)?$
                {
                fastcgi_pass  unix:/tmp/perl-fastcgi.sock;
                fastcgi_index index.cgi;
                fastcgi_param   SCRIPT_FILENAME  $document_root$fastcgi_script_name;
                include         fastcgi_params;
                }
                access_log none;
}
新建index.pl脚本测试,加x执行权限。
#!/usr/bin/perl
print "Content-type: text/html\n\n";
print "<html><body>Hello, world.</body></html>";访问https://www.haiyun.me,如果正常就会显示Hello,world.
发布时间:May 30, 2012 // 分类:流量监控 // No Comments
Ntop是一款强大的网络监控工具,可以直观、详细的列出各个节点的网络流量及带宽使用率,通过它分析当前网络中存在的问题,保证网络运行的效率和安全。
Centos下可使用yum安装,不过版本较低,还会安装一些非必要的软件。
yum -y install ntop下面记录以源码编译方式安装ntop,首先安装编译环境及支持组件,如未找到rrdtool可先安装epel源。
yum -y install gcc make libtool automake autoconf rrdtool-devel libpcap-devel gdbm-devel zlib-devel geoip-devel 安装ntop:
wget http://nchc.dl.sourceforge.net/project/ntop/ntop/Stable/ntop-4.1.0.tar.gz
tar zxvf ntop-4.1.0.tar.gz
cd ntop-4.1.0/
./autogen.sh
./configure
make && make install
新建ntop用户,授予ntop目录权限:
useradd -M -s /sbin/nologin ntop
chown -R ntop:ntop //usr/local/share/ntop
chown -R ntop:ntop /usr/local/var/ntop
设置ntop密码:
/usr/local/bin/ntop -A启动ntop:
/usr/local/bin/ntop -d  -u ntop -i eth0
-d 后台运行
-u 运行用户
-i 监控网卡访问http://ip:3000即可通过web界面管理ntop,如https://www.haiyun.me:3000。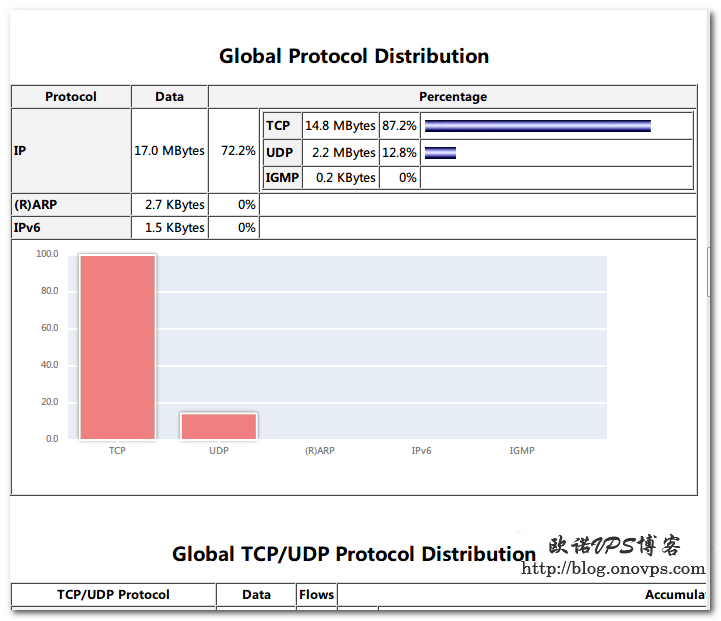
发布时间:May 30, 2012 // 分类:Linux服务 // No Comments
在centos下编译安装ntop时遇到如下错误:
checking for pcap_lookupdev in -lpcap... no
             *** FATAL ERROR ***
 It looks that you don't have the libpcap distribution installed.
 Download, compile and, optionally, install it.
 When finished please re-run this program.
 You can download the latest source tarball at http://www.tcpdump.org/
configure: error:  The LBL Packet Capture Library, libpcap, was not found!
查看libpcap是否安装:
rpm -q libpcap
libpcap-0.9.4-15.el5
安装libpcap-devel:
yum install libpcap-devel重新编译解决。