关于PXE服务器配置、客户端引导见之前文章:使用TFTP/PXE引导安装Centos系统。
通过KickStart自动安装只需修改最后PXE引导菜单配置文件:
cat /tftpboot/pxelinux.cfg/default
#www.haiyun.me
timeout 5
default menu.c32
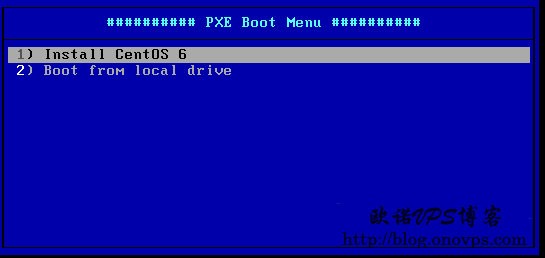
menu title ########## PXE Boot Menu ##########
label 1
menu label ^1) Install CentOS 6
kernel centos6/vmlinuz
append initrd=centos6/initrd.img ks=nfs:192.168.1.3:/tftpboot/ks.cf
#引导获取KickStart配置文件,然后在KickStart文件中配置安装源。KickStart配置文件可使用图形化配置,需安装桌面或开启X-Windows环境转发。
yum install system-config-kickstart 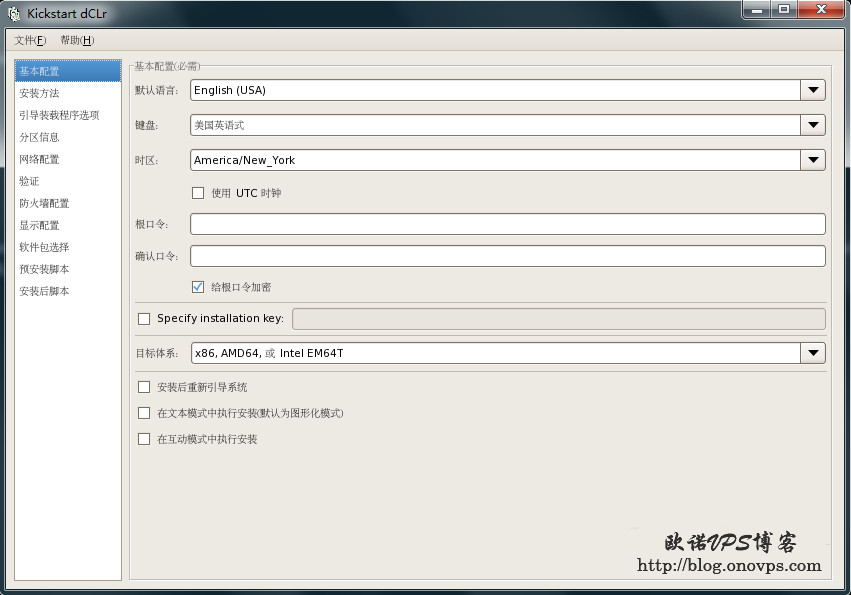
KickStart配置文件示例:
text
install
nfs --server=192.168.1.3 --dir=/mnt
#光盘镜像挂载目录
#url --url=http://192.168.1.3/mnt/ #可使用http或ftp
keyboard us
lang zh_CN.UTF-8
network --device eth0 --bootproto static --ip 192.168.1.30 --netmask 255.255.255.0
--gateway 192.168.1.1 --nameserver 192.168.1.1 --hostname centos5.7-x64
firewall --disabled
rootpw onovps
authconfig --enableshadow --passalgo=sha512
selinux --disabled
timezone Aisa/Shang_Hai
bootloader --location=mbr
zerombr
clearpart --all --initlabel
part /boot --fstype ext4 --fsoptions="noatime" --size=200
part pv.1 --size 1 --grow
volgroup vg0 --pesize=4096 pv.1
logvol / --fstype ext4 --fsoptions="noatime" --name=root --vgname=vg0 --grow --size=8192
logvol swap --fstype swap --name=swap --vgname=vg0 --size 2048

%post
%end
%packages
@base
%end
这样局域网下机器以PXE启动就自动安装为相应的系统了。