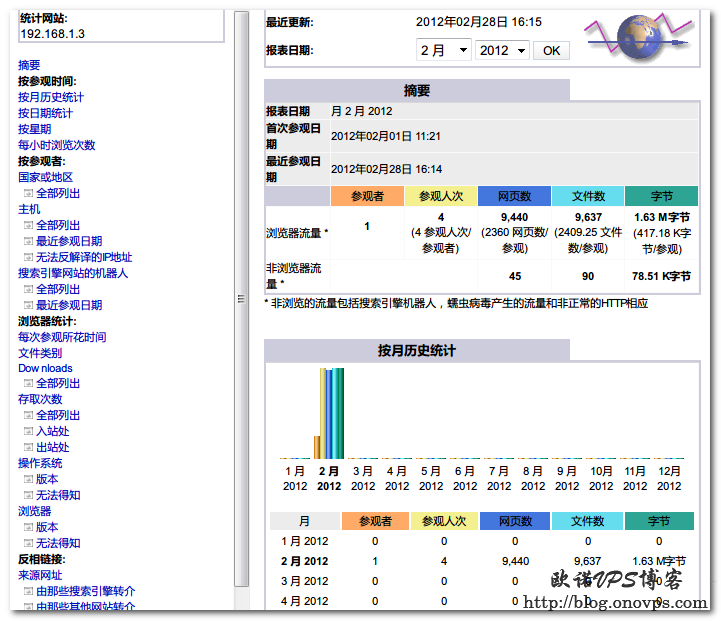
Awstats是用perl语言编写的web日志分析软件,可用于Apache、IIS、Nginx访问日志分析,界面友好、功能强大,支持中文显示。
LAMP环境下Awstats安装:
wget http://prdownloads.sourceforge.net/awstats/awstats-7.0.tar.gz
tar zxvf awstats-7.0.tar.gz
mv awstats-7.0 /usr/local/awstats
chown -R apache:apache /usr/local/awstats
生成配置文件:
cd /usr/local/awstats/
perl /usr/local/awstats/tools/awstats_configure.pl
按提示进行:
[root@centos5 awstats]# perl /usr/local/awstats/tools/awstats_configure.pl

----- AWStats awstats_configure 1.0 (build 1.9) (c) Laurent Destailleur -----
This tool will help you to configure AWStats to analyze statistics for
one web server. You can try to use it to let it do all that is possible
in AWStats setup, however following the step by step manual setup
documentation (docs/index.html) is often a better idea. Above all if:
- You are not an administrator user,
- You want to analyze downloaded log files without web server,
- You want to analyze mail or ftp log files instead of web log files,
- You need to analyze load balanced servers log files,
- You want to 'understand' all possible ways to use AWStats...
Read the AWStats documentation (docs/index.html).

-----> Running OS detected: Linux, BSD or Unix

-----> Check for web server install

Enter full config file path of your Web server.
Example: /etc/httpd/httpd.conf
Example: /usr/local/apache2/conf/httpd.conf
Example: c:\Program files\apache group\apache\conf\httpd.conf
Config file path ('none' to skip web server setup):
> /etc/httpd/conf/httpd.conf #输入Apache配置文件路径

-----> Check and complete web server config file '/etc/httpd/conf/httpd.conf'
  Add 'Alias /awstatsclasses "/usr/local/awstats/wwwroot/classes/"'
  Add 'Alias /awstatscss "/usr/local/awstats/wwwroot/css/"'
  Add 'Alias /awstatsicons "/usr/local/awstats/wwwroot/icon/"'
  Add 'ScriptAlias /awstats/ "/usr/local/awstats/wwwroot/cgi-bin/"'
  Add '<Directory>' directive
  AWStats directives added to Apache config file.

-----> Update model config file '/usr/local/awstats/wwwroot/cgi-bin/awstats.model.conf'
  File awstats.model.conf updated.

-----> Need to create a new config file ?
Do you want me to build a new AWStats config/profile
file (required if first install) [y/N] ? y

-----> Define config file name to create
What is the name of your web site or profile analysis ?
Example: www.mysite.com
Example: demo
Your web site, virtual server or profile name:
> www.haiyun.me #输入要分析的网站域名

-----> Define config file path
In which directory do you plan to store your config file(s) ?
Default: /etc/awstats
Directory path to store config file(s) (Enter for default):
>  #awstats配置文件目录,默认/etc/awstats

-----> Create config file '/etc/awstats/awstats.www.haiyun.me.conf'
 Config file /etc/awstats/awstats.www.haiyun.me.conf created.

-----> Restart Web server with '/sbin/service httpd restart'
停止 httpd:                                               [确定]
启动 httpd:                                               [确定]

-----> Add update process inside a scheduler
Sorry, configure.pl does not support automatic add to cron yet.
You can do it manually by adding the following command to your cron:
/usr/local/awstats/wwwroot/cgi-bin/awstats.pl -update -config=www.haiyun.me
Or if you have several config files and prefer having only one command:
/usr/local/awstats/tools/awstats_updateall.pl now
Press ENTER to continue...


A SIMPLE config file has been created: /etc/awstats/awstats.www.haiyun.me.conf
You should have a look inside to check and change manually main parameters.
You can then manually update your statistics for 'www.haiyun.me' with command:
> perl awstats.pl -update -config=www.haiyun.me
You can also read your statistics for 'www.haiyun.me' with URL:
> http://localhost/awstats/awstats.pl?config=www.haiyun.me

Press ENTER to finish...编辑Awstats配置文件修改日记文件目录:
vim /etc/awstats/awstats.www.haiyun.me.com.conf
LogFile="/var/log/httpd/access_log"
新建Awstat数据存放目录:
mkdir /var/lib/awstats更新Awstat数据:
perl /usr/local/awstats/tools/awstats_updateall.pl now访问localhost/awstats/awstats.pl?config=www.haiyun.me即可查看Awstats管理界面:
Awstats界面无密码验证,为安全可配合Apache进行密码验证。


